Avaje Inject
Fast and light dependency injection library for Java and Kotlin developers.
| Discord | Source | API Docs | Issues | Releases |
|---|---|---|---|---|
| Discord | GitHub | Javadoc | GitHub |  |
Inject leverages Java annotation processing to generate source code for efficient dependency injection. By shifting the responsibility of dependency injection from runtime to build time, it significantly enhances the speed of application startup. This approach eliminates the need for intensive reflection or classpath scanning, further optimizing performance.
The dependency injection classes are generated source code. This allows a seamless debugging experience where breakpoints can be set into the DI code. You can step through the code as if it were manually written and use existing IDE tools to search where code is called (e.g. Constructors and lifecycle methods.)
For a background on why avaje inject exists and a quick comparison with other DI libraries such as Dagger2, Micronaut, Quarkus and Spring go to - Why.
DI Library Size
|
Do we care about the size of a DI library? Why is avaje-inject so much smaller? avaje-inject exists with the view that it should be really small and provide JSR-330 dependency injection using source code generation. avaje-inject includes:
|

|
Releases for javax and jakarta
The move of JEE to the eclipse foundation meant a change in package from javax
to jakarta for various APIs including JSR-330 dependency injection API.
Today we have the choice of using the javax.inject dependency or using the new
jakarta.inject dependency.
Want to use jakarta.inject?
Use version 9.x of
avaje-inject with the dependency on jakarta.inject
Want to use javax.inject?
Use version 9.x-javax of
avaje-inject with the dependency on javax.inject.
Based on JSR-330
avaje inject is based on JSR-330: Dependency Injection for Java - javax.inject / jakarta.inject with some extensions similar to Spring DI.
JSR-330 provides:
JSR 250 - Common Annotations for Java provides:
@PostConstruct and @PreDestroy are part of Common Annotations API.
These were in JDK 8, but from JDK 9 onwards are part of JDK module javax.annotation-api.
Currently, neither Dagger2 nor Guice support or plan to support @PostConstruct
and @PreDestroy lifecycle annotations.
DI extensions to JSR-330
Component Testing
We use @InjectTest for component testing, similar
to Spring's @SpringBootTest.
This is where we get avaje-inject to wire the test class using @Inject, @Mock, @Spy.
@Factory + @Bean
In addition to the JSR-330 standard, we use @Factory + @Bean which have a similar function as Spring DI's @Configuration + @Bean and also Micronaut's @Factory + @Bean. This is also similar to a Guice module with @Provides methods.
Teams will often use @Factory + @Bean to provide dependencies that are best created programmatically. Typically, these depend on external configuration, environment settings, etc.
Factory provides a more convenient alternative to the JSR-330 javax.inject.Provider<T> interface and is also more natural for people who are familiar with Spring DI or Micronaut DI.
@Primary + @Secondary
Additionally we use @Primary @Secondary annotations which work the same as Spring DI's @Primary + @Secondary and also Micronaut DI's @Primary + @Secondary. These provide injection priority in the case when multiple injection candidates are available.
Quick Start
1. Add avaje-inject as a dependency.
<dependency>
  <groupId>io.avaje</groupId>
  <artifactId>avaje-inject</artifactId>
  <version>${avaje.inject.version}</version>
</dependency>
2. Add avaje-inject-generator annotation processor as a dependency with provided scope.
<!-- Annotation processors -->
<!-- if using lombok, it must be placed before the inject generator.
<dependency>
    <groupId>org.projectlombok</groupId>
    <artifactId>lombok</artifactId>
    <version>1.18.30</version>
    <scope>provided</scope>
</dependency> -->
<dependency>
  <groupId>io.avaje</groupId>
  <artifactId>avaje-inject-generator</artifactId>
  <version>${avaje.inject.version}</version>
  <scope>provided</scope>
  <optional>true</optional>
</dependency>
2a. JDK 23+
In JDK 23+, annotation processors are disabled by default, so on maven we add a compiler property to re-enable.
<properties>
  <maven.compiler.proc>full</maven.compiler.proc>
</properties>
3. Create a Bean Class annotated with @Singleton
@Singleton
public class Example {

 private DependencyClass d1;
 private DependencyClass2 d2;

  // Dependencies must be annotated with singleton,
  // or else be provided from another class annotated with @Factory
  public Example(DependencyClass d1, DependencyClass2 d2) {
    this.d1 = d1;
    this.d2 = d2;
  }
}
Example factory class:
@Factory
public class ExampleFactory {
  @Bean
  public DependencyClass2 bean() {
    return new DependencyClass2();
  }
}
4. Use BeanScope to wire and retrieve the beans.
BeanScope beanScope = BeanScope.builder().build()
Example ex = beanScope.get(Example.class);
Dependencies
Maven
See the quick start example
Gradle
See the example at: examples/javalin-gradle-java-basic/build.gradle
Gradle 5.2+
Use Gradle version 5.2 or greater which has better support for annotation processing.
Dependencies
Add avaje-inject as an implementation dependency, avaje-inject-generator as an annotation processor, and avaje-inject-test as a test dependency.
dependencies {
  ...
  implementation('io.avaje:avaje-inject:${inject.version}')
  annotationProcessor('io.avaje:avaje-inject-generator:${inject.version}')

  testImplementation('io.avaje:avaje-inject-test:${inject.version}')
  testAnnotationProcessor('io.avaje:avaje-inject-generator:${inject.version}')
}
Kotlin KAPT
See example at: https://github.com/dinject/examples/blob/master/basic-di-kotlin-maven/pom.xml
For use with Kotlin, register avaje-inject-generator as a kapt processor
to the Kotlin compiler rather than annotationProcessor.
dependencies {
  ...
  implementation('io.avaje:avaje-inject:${inject.version}')
  kapt('io.avaje:avaje-inject-generator:${inject.version}')

  testImplementation('io.avaje:avaje-inject-test:${inject.version}')
}
Java Module Setup
If using java modules, in the module-info.java:
- Add a requires clause for io.avaje.inject
- Add a provides clause for io.avaje.inject.spi.InjectSPI
Example module-info
import io.avaje.inject.spi.InjectExtension;

module org.example {

  requires io.avaje.inject;
  // you must define the fully qualified class name of the generated classes. if you use an import statement, compilation will fail
  provides InjectExtension with org.example.ExampleModule;
}
In the example above, org.example.ExampleModule is generated code typically found in
target/generated-sources/annotations.
External Avaje Dependencies
If your project uses the module system and imports maven dependencies that provide inject Plugin/Module classes, you will need to add the maven/gradle inject plugin so that the generated DI classes from the dependencies are discovered.
Generated Sources
DI classes
DI classes will be generated to call the constructors for annotated type/factory methods.
Below is the class generated for the Example class in the above quickstart.
@Generated("io.avaje.inject.generator")
public final class Example$DI  {

  /**
   * Create and register Example.
   */
  public static void build(Builder builder) {
    if (builder.isBeanAbsent(Example.class)) {
      var bean = new Example(builder.get(DependencyClass.class,"!d1"), builder.get(DependencyClass2.class,"!d2"));
      builder.register(bean);
      // depending on the type of bean, callbacks for field/method injection, and lifecycle support will be generated here as well.
    }
  }
}
Generated Wiring Class
The inject annotation processor will determine the dependency wiring order of a project and generate an AvajeModule class that will wire the beans.
Generated ExampleModule
@Generated("io.avaje.inject.generator")
@InjectModule
public final class ExampleModule implements AvajeModule {

  private Builder builder;

  @Override
  public Class<?>[] classes() {
    return new Class<?>[] {
      org.example.DependencyClass.class,
      org.example.DependencyClass2.class,
      org.example.Example.class,
      org.example.ExampleFactory.class,
    };
  }

  /**
   * Creates all the beans in order based on constructor dependencies. The beans are registered
   * into the builder along with callbacks for field/method injection, and lifecycle
   * support.
   */
  @Override
  public void build(Builder builder) {
    this.builder = builder;
    // create beans in order based on constructor dependencies
    // i.e. "provides" followed by "dependsOn"
    build_example_ExampleFactory();
    build_example_DependencyClass();
    build_example_DependencyClass2();
    build_example_Example();
  }

  @DependencyMeta(type = "org.example.ExampleFactory")
  private void build_example_ExampleFactory() {
    ExampleFactory$DI.build(builder);
  }

  @DependencyMeta(type = "org.example.DependencyClass")
  private void build_example_DependencyClass() {
    DependencyClass$DI.build(builder);
  }

  @DependencyMeta(
      type = "org.example.DependencyClass2",
      method = "org.example.ExampleFactory$DI.build_bean", // factory method
      dependsOn = {"org.example.ExampleFactory"}) //factory beans naturally depend on the factory
  private void build_example_DependencyClass2() {
    ExampleFactory$DI.build_bean(builder);
  }

  @DependencyMeta(
      type = "org.example.Example",
      dependsOn = {"org.example.DependencyClass", "org.example.DependencyClass2"})
  private void build_example_Example() {
    Example$DI.build(builder);
  }
}
Injection
@Singleton
Put @Singleton on beans to include them in dependency injection.
These are beans that are created ("wired") by dependency injection and put into the scope, available to be injected into other beans.
@Singleton
public class CoffeeMaker {
  ...
@Component
@Component is similar to JSR-330 @Singleton except it is avaje-inject
specific. It's preferable to use the JSR-330 standard annotations, but there are a few cases
where @Component has an advantage.
- A project is using another DI library (for example, Guice) that processes the standard
@Singletonand we want avaje-inject to co-exist but ignore anything annotated with@Singleton. -
A project wants to work with both
javax.injectandjakarta.injectfor some reason.
@Component
public class CoffeeMaker {
  ...
Ignoring @Singleton
To get avaje-inject to ignore any classes annotated with @Singleton use:
@InjectModule(ignoreSingleton = true)
@Component.Import
Put @Component.Import on a class/package-info to create dependency injection on external classes (e.g. mvn dependencies).
It has the same effect as if the bean was directly annotated by @Singleton or @Component.
@Component.Import(TeaMaker.class)
@Singleton
public class CoffeeMaker {
  ...
@Inject
Put @Inject on the constructor/field used for constructor dependency injection.
Constructor Injection
The below CoffeeMaker uses constructor injection. Both a Pump and Grinder will be injected into the constructor when the bean scope creates the CoffeeMaker.
@Singleton
public class CoffeeMaker {

  private final Pump pump;

  private final Grinder grinder;

  @Inject
  public CoffeeMaker(Pump pump, Grinder grinder) {
    this.pump = pump;
    this.grinder = grinder;
  }

  public CoffeeMaker() {
    //other constructor
  }
  ...
Single Constructors
If there is only one constructor, you don't need
to specify @Inject. This includes records and kotlin data classes.
@Singleton
public class CoffeeMaker {

  private final Pump pump;
  private final Grinder grinder;

  public CoffeeMaker(Pump pump, Grinder grinder) {
    this.pump = pump;
    this.grinder = grinder;
  }
}
@Singleton
public record CoffeeMaker(Pump pump, Grinder grinder) {}
@Singleton
class CoffeeMaker(private val pump: Pump, private val grinder: Grinder) {}
Field Injection
@Singleton
public class CoffeeMaker {

  @Inject
  Pump pump;

  @Inject
  Grinder grinder;
  ...
With field injection the @Inject is placed on the field. The field cannot be private
or final.
Constructor injection preferred
Constructor injection has many advantages over field injection as it:
- Promotes immutability / use of final fields / proper initialization
- Communicates required dependencies at compile time. Helps when dependencies change to keep test code in line.
- Helps identify when there are too many dependencies. Too many constructor arguments is a more obvious code smell compared to field injection. Promotes single responsibility principle.
Circular dependencies
Field/method injection is effective to solve circular dependencies. See below for more details.
Kotlin field injection
For Kotlin, consider using lateinit on the property with field injection.
@Singleton
class Grinder {

  @Inject
  lateinit var pump: Pump

  fun grind(): String {
    ...
  }
}
Method Injection
For method injection annotate a method with @Inject.
@Singleton
public class CoffeeMaker {

  Grinder grinder;

  @Inject
  void setGrinder(Grinder grinder) {
    this.grinder = grinder;
  }
  ...
Mixed constructor, field and method injection
Classes can mix constructor, field and method injection. In the below example, the Grinder is injected into the constructor and the Pump is injected by field injection.
@Singleton
public class CoffeeMaker {

  @Inject
  Pump pump;

  private final Grinder grinder;

  public CoffeeMaker(Grinder grinder) {
    this.grinder = grinder;
  }
Circular Dependencies
Resolving circular dependencies requires either field injection or method injection on one of the dependencies.
Say we have A and B where A depends on B and B depends on A. In this case we can't use constructor injection for both A and B like:
// circular dependency with constructor injection, this will not work!!

@Singleton
class A {
  B b;
  A(B b) {       // constructor for A depends on B
    this.b = b;
  }
}

@Singleton
class B {
  A a;
  B(A a) {       // constructor for B depends on A
    this.a = a;
  }
}
With the above circular dependencies for A and B constructor injection, avaje-inject cannot determine the order in which to construct the beans. avaje-inject will detect this and produce a compilation error outlining the beans involved and ask us to change to use field injection for one of the dependencies.
@Singleton
class A {
  @Inject   // use field injection
  B b;
}

@Singleton
class B {
  A a;
  B(A a) {
    this.a = a;
  }
}
The reason this works is that field/method injection occur after all the dependencies are constructed. avaje-inject uses 3 phases to construct a bean scope:
- Phase 1: Construct all the beans in order based on constructor dependencies
- Phase 2: Apply field injection and method injection on all beans
- Phase 3: Execute all
@PostConstructlifecycle methods
Circular dependencies more commonly occur with more than 2 beans. For example, let's say we have A, B and C where:
- A depends on B
- B depends on C
- C depends on A
With A, B, C above they combine to create a circular dependency. To handle this we need to use field injection or method injection on one of the dependencies.
Optional
We can use java.util.Optional<T> to inject optional dependencies.
These are dependencies that might not be provided / might not have an available implementation
/ might only be provided based on configuration (a bit like a feature toggle).
@Singleton
class Pump {

  private final Heater heater;

  private final Optional<Widget> widget;

  @Inject
  Pump(Heater heater, Optional<Widget> widget) {
    this.heater = heater;
    this.widget = widget;
  }

  public void pump() {
    if (widget.isPresent()) {
      widget.get().doStuff();
    }
    ...
  }
}
Spring DI Note
Spring users will be familiar with the use of @Autowired(required=false)
for wiring optional dependencies. With avaje-inject we instead use Optional
or @Nullable to inject optional dependencies.
@Nullable
As an alternative to Optional, @Nullable is used to indicate that a dependency
is optional / can be null. Any @Nullable annotation can be used, it does not
matter which package the annotation is in.
@Singleton
class Pump {

  private final Heater heater;

  private final Widget widget;

  @Inject
  Pump(Heater heater, @Nullable Widget widget) {
    this.heater = heater;
    this.widget = widget;
  }

  public void pump() {
    if (widget != null) {
      widget.doStuff();
    }
    ...
  }
}
Spring DI Note
Spring users will be familiar with the use of @Autowired(required=false)
for wiring optional dependencies. With avaje-inject, the equivalent is to use Optional
or @Nullable to inject optional dependencies.
@External
@External essentially signals that this dependency is provided at runtime. This is needed because Avaje validates the entire dependency graph at compile-time and fails compilation when all required beans are not provided by avaje.
When using @External, the dependency is expected to be provided to avaje manually via BeanScopeBuilder#bean.
@Singleton
class Pump {

  private final Heater heater;

  private final ExternalWidget widget;

  @Inject
  Pump(Heater heater, @External ExternalWidget widget) {
    this.heater = heater;
    this.widget = widget;
  }
}
List
We can inject a java.util.List<T> of beans that implement an interface.
@Singleton
public class CombinedBars {

  private final List<Bar> bars;

  @Inject
  public CombinedBars(List<Bar> bars) {
    this.bars = bars;
  }
Set
We can inject a java.util.Set<T> of beans that implement an interface.
@Singleton
public class CombinedBars {

  private final Set<Bar> bars;

  @Inject
  public CombinedBars(Set<Bar> bars) {
    this.bars = bars;
  }
Provider
A Singleton bean can implement (javax/jakarta).inject.Provider<T> to create a bean to
be used in injection.
@Singleton
class FooProvider implements Provider<Foo> {

  private final Bazz bazz;

  FooProvider(Bazz bazz) {
    this.bazz = bazz;
  }

  @Override
  public Foo get() {
    // maybe do interesting logic, read environment variables ...
    return new BasicFoo(bazz);
  }
}
When using Provider<T> get() a new instance is returned each time we
call get(). This is effectively the
same as Prototype scope.
@Singleton
class UseFoo  {

  private final Provider<Foo> fooProvider;

  UseFoo(Provider<Foo> fooProvider) {
    this.fooProvider = fooProvider;
  }

  void doStuff() {

    // get a Foo instance and use it
    Foo foo = fooProvider.get();
    ...
  }
}
An alternative to implementing the Provider<T> interface is
to instead use @Factory and @Bean
which can be more flexible and convenient.
Limiting Injectable Types
When you annotate a bean with @Singleton or create via a @Factory class, the bean class and all interfaces it implements and super classes it extends become injectable.
For cases where this is not desired, use @BeanTypes to limit the types available to inject a particular bean.
@Singleton
@BeanTypes(Appliance.class)
public class CoffeeMaker implements Machine, Appliance {
  ...
var scope = BeanScope.builder().build();
//we can only retrieve the bean as an instance of Appliance
scope.get(Appliance.class);
//throws not found exception
scope.get(CoffeeMaker.class);
@Factory
Factory beans allow us to programmatically create a bean. Often the logic is based on external configuration, environment variables, system properties etc.
Annotate a class with @Factory to tell the processor that it contains methods
that create beans.
@Factory @Bean are equivalent to Spring DI @Configuration @Bean and Micronaut @Factory @Bean. Guice users will see this as similar to Modules with @Provides methods.
@Bean
Annotate methods on the factory class that create a bean with @Bean.
These methods can have dependencies and will execute in the appropriate order
depending on the dependencies they require.
Example
@Factory
class Configuration {

  private final StartConfig startConfig;

  /**
   * Factory can have dependencies.
   */
  @Inject
  Configuration(StartConfig startConfig) {
    this.startConfig = startConfig;
  }

  @Bean
  Pump buildPump() {
    // maybe read System properties or environment variables
    return new FastPump(...);
  }

  /**
   * Method with dependencies as method parameters.
   */
  @Bean
  CoffeeMaker buildBar(Pump pump, Grinder grinder) {
    // maybe read System properties or environment variables
    return new CoffeeMaker(...);
  }
}
@Bean autocloseable
The avaje annotation processor reads the return types to detect if the bean is an instance of Closeable or AutoCloseable.
In the case where you are wiring an interface that doesn't implement these types, but the concrete class implements, specify autocloseable to inform the processor.
@Factory
class Configuration {
  ...
  @Bean(autocloseable = true)
  CoffeeMaker buildCoffeeMaker(Pump pump) {
    return new CloseableCoffeeMaker(pump);
  }
}
@Bean initMethod & destroyMethod
With @Bean, initMethod is used to register a method on the type
which will be executed on startup similar to @PostConstruct.
Similarly a destroyMethod can be specified to execute on shutdown like @PreDestroy.
Example
@Factory
class Configuration {
  ...
  @Bean(initMethod = "init", destroyMethod = "close")
  CoffeeMaker buildCoffeeMaker(Pump pump) {
    return new CoffeeMaker(pump);
  }
}
The CoffeeMaker has the appropriate methods that are executed as part of the lifecycle.
class CoffeeMaker {
  public void init() {
    // lifecycle executed on start/PostConstruct
  }
  public void close() {
    // lifecycle executed on shutdown/PreDestroy
  }
  ...
}
Optional @Bean
Use Optional<T> to indicate that the method produces
an optional dependency.
Often, a dependency is only provided based on external configuration. For example, in a CI/CD environment a bean may not be needed, while in a different environment it must be wired.
Example - Optional dependency
@Factory
class Configuration {

  /**
   * Optionally provide MessageQueue.
   */
  @Bean
  Optional<MessageQueue> buildQueue() {
    if (...) { // maybe read external config etc
      // Not providing the dependency (kind of like feature toggle)
      return Optional.empty();
    }
    return Optional.of(...);
  }

}
@Prototype Scoped Beans
When the @Prototype annotation is added to a class/factory bean method, a new instance of the bean will be created each time it is requested or wired.
@Prototype
public class Proto {
  //every time this bean is requested, the constructor is called to provide another instance
  ...
  }
@Factory
class ProtoFactory {
  //every time this bean is requested, the factory method is called to provide another instance
  @Bean
  @Prototype
  Example proto() {
    return new Example();
  }

}
@Factory
void main() {
  //every time this bean is requested, it is constructed anew.
  var beans = BeanScope.builder().build();
  // two separate instances
  assert beans.get(Proto.class) != beans.get(Proto.class)
}
@Lazy Beans
Place @Lazy on beans/factory methods to defer bean initialization until the bean is requested and one of its methods are called. Once requested, the same singleton will be returned by all subsequent bean requests.
@Lazy
public class Sloth {

  private final Moss moss;

  @Inject //this will not be called until the bean is requested
  Sloth(Moss moss) {
    this.moss = moss;
  }

  //no-arg constructor needed to create a generated proxy
  Sloth() {
    this.moss = null;
  }

  public void climb(){
    //something
  }
}
There are two ways to lazily load the bean.
1. Directly retrieve from the bean scope:
final var scope = BeanScope.builder().build();
var sloth = scope.get(Sloth.class);
sloth.climb(); //Sloth is initialized here
2. Use a Provider
Lazy providers have the Singleton scope. The same singleton instance will be returned on all requests to Provider#get.
@Singleton
class UseSloth  {

  private final Provider<Sloth> slothProvider;

  UseFoo(Provider<Sloth> slothProvider) {
    this.slothProvider = slothProvider;
  }

  void doStuff() {

    // get the singleton Sloth instance
    Sloth sloth = slothProvider.get();
    //same instance returned
    assert sloth == slothProvider.get();
    ...
  }
}
Bean Priority
For cases where multiple beans have the same type and qualifier, the following annotations can control the wiring priority.
@Primary
A bean with @Primary is deemed to be highest priority and will be injected and used over all others.
There should only ever be one bean implementation marked as @Primary for a given dependency.
Example
// Highest priority EmailServer
// Used when available (e.g. module in the class path)
@Primary
@Singleton
public class PreferredEmailSender implements EmailServer {
  ...
@Priority
A bean with @Priority allows you to define a custom priority and will only be injected
if there are no other higher priority bean candidates.
Example
// Lower priority EmailServer
// Only used if no other higher priority EmailServer is available
@Priority(5)
@Singleton
public class DefaultEmailSender implements EmailServer {
  ...
@Secondary
A bean with @Secondary is deemed to be lowest priority and will only be injected
if there are no other candidates to inject. @Secondary can be used to indicate a
"default" or "fallback" implementation that will be superseded by any other available implementation.
Example
// Lowest priority EmailServer
// Only used if no other EmailServer is available
@Secondary
@Singleton
public class DefaultEmailSender implements EmailServer {
  ...
Use of @Primary and @Secondary
@Primary and @Secondary are used when there are
multiple candidates to inject. They provide a "priority" to determine which dependency to
inject and use when injecting a single implementation and multiple candidates are available
to inject.
@Primary and @Secondary are typically used when building multi-module applications. With multiple modules (jars) that provide implementations, @Secondary can indicate a "default" or "fallback" implementation to use and @Primary can indicate the best implementation to use when it is available. avaje-inject DI will then wire depending on which modules (jars) are included in the classpath.
Qualifiers
@Named
When multiple bean candidates exist, we can qualify
which instance to use by specifying @Named on the beans and where
they are injected.
Qualifier names are case insensitive.
Lets say we have a Store interface with multiple implementations. We can have multiple implementations with @Named qualifier like the example below.
@Singleton
@Named("blue")
public class BlueStore implements Store {
  ...
}


@Singleton
@Named("red")
public class RedStore implements Store {
  ...
}
Alternatively if we are creating the instances using @Factory @Bean methods we can similarly put @Named on the @Bean methods.
@Factory
public class StoreFactory {

  @Bean
  @Named("red")
  public Store createRedStore() {
    return new RedStore(...);
  }

  @Bean
  @Named("blue")
  public Store createBlueStore() {
    return new BlueStore(...);
  }
}
Finally, we can specify the name when explicitly registering a bean with a BeanScope.
We can then specify which @Named instance to inject by specifying the qualifier.
@Singleton
public class OrderProcessor {
  private final Store store;

  public OrderProcessor(@Named("red") Store store) {
    this.store = store;
  }
  ...
@Singleton
public class OrderProcessor {

  @Inject
  @Named("red")  // field injection
  Store store;

  ...
@Named is a standard part of Java dependency injection frameworks. Avaje Inject goes further and eliminates the need for
writing out the annotation at all. All injectable parameters or fields that don't specify @Named explicitly are implicitly
given a name of !name. So the above can be more cleanly written by relying on this implicit rule, like this:
@Singleton
public class OrderProcessor {
  private final Store store;

  public OrderProcessor(Store red) {
    this.store = red;
  }
  ...
This type of implicit naming is useful if you want to inject things with a relatively widely used type, for example,
a java.nio.file.Path object.
@Qualifier
Instead of using @Named we can create our own annotations using @Qualifier.
This gives a strongly typed approach to qualifying the beans rather than using string literals in
@Named so could be better when there is a lot of named/qualified beans.
example
import jakarta.inject.Qualifier;
import java.lang.annotation.Retention;
import java.lang.annotation.RetentionPolicy;

@Qualifier
@Retention(RetentionPolicy.RUNTIME)
public @interface Blue {}
Then we can use our @Blue annotation.
@Blue
@Singleton
public class BlueStore implements Store {
  ...
@Singleton
public class StoreManager {

  private final Store store;

  public StoreManager(@Blue Store store) {
    this.store = store;
  }
  ...
Qualifiers with members
Java annotations can have members. We can use these members to further discriminate a qualifier. This prevents a potential explosion of new annotation interfaces. For example, instead of creating several qualifiers representing different payment methods, we could aggregate them into a single annotation with a member:
@Qualifier
@Retention(RUNTIME)
@Target({METHOD, FIELD, PARAMETER, TYPE})
public @interface Accepts {
   CardType value();
}
Then we select one of the possible member values when applying the qualifier:
@Accepts(VISA)
@Singleton
public class VisaStore implements Store {
  ...
@Singleton
public class StoreManager {

  private final Store store;

  public StoreManager(@Accepts(VISA) Store store) {
    this.store = store;
  }
  ...
@QualifiedMap
To receive a map of beans keyed by qualifier name, we can use @QualifiedMap.
@Singleton
 class CrewMate {

   private final Map<String, Tasks> taskMap;

   @Inject
   CrewMate(@QualifiedMap Map<String, Tasks> taskMap) {
     this.taskMap = taskMap;
   }

 }
Assisted Injection
Assisted injection is a dependency injection pattern used to construct an object where some parameters are provided by the DI framework and others must be passed in at creation time by the user.
Avaje Inject will generate a factory implementation responsible for combining all of the parameters and creating the object.
@AssistFactory
To use assisted injection, annotate a class with @AssistFactory to signal the generator to create a factory class.
@AssistFactory requires an interface/abstract class type that has the assisted types as parameters.
To mark fields/method parameters as assisted, annotate them with @Assisted, as shown below:
@AssistFactory(CarFactory.class)
public class Car {

  @Assisted Make make;
  @Inject Wheel wheel;

  public Car(@Assisted Paint paint, @Nullable Engine engine) {
  //  ...
  }

  //will be triggered after construction
  @Inject
  void injectMethod(@Assisted int size, Steel steel) {
  //  ...
  }

  //Factory Type the generated code will implement
  public interface CarFactory {
    Car fabricate(Paint paint, int size, Make make);
  }
}
We can now wire a factory instance and use in our application
@Singleton
public class Dealer {

  CarFactory factory;

  @Inject
  public Dealer(CarFactory factory) {
    this.factory = factory;
  }


  Car orderCar(Order order) {
    //  ...
    return factory.fabricate(paint, size, make)
  }
}
Generated Code
Avaje Inject will read an assisted bean to generate a factory, here is the generated factory for the above Car class:
@Component
final class Car$AssistFactory implements CarFactory {

  @Inject
  Wheel wheel$field;

  private Steel steel$method;
  private final Engine engine;

  Car$AssistFactory(@Nullable Engine engine) {
    this.engine = engine;
  }

  /**
   * Fabricates a new Car.
   */
  @Override
  public Car construct(Paint paint, int size, Make make) {
    var bean = new Car(paint, engine);
    bean.wheel = wheel$field;
    bean.make = make;
    bean.injectMethod(size, steel$method);
    return bean;
  }

  @Inject
  void injectMethod(Steel steel) {
    this.steel$method = steel;
  }
}
Lifecycle
@PostConstruct
Put @PostConstruct on a method to run it on startup just after all the
beans have been wired.
Typically we open a resource like network connections to a remote resource (cache, queue, database etc).
@Singleton
public class CoffeeMaker {

  @PostConstruct
  void onStartup() {
    // connect to remote resource ...
    ...
  }
  ...
@PostConstruct with BeanScope
Since post construct methods execute after all the beans have been wired, the completed BeanScope can be a parameter.
@Singleton
public class CoffeeMaker {
  Beans beans;

  @PostConstruct
  void onStartup(BeanScope scope) {
   beans = scope.get(Beans.class);
  }
  ...
@PreDestroy
Put @PreDestroy on a method to run on shutdown. (Typically to close resources)
@Singleton
public class CoffeeMaker {

  @PreDestroy
  void onShutdown() {
    // close resources
    ...
  }

  @PreDestroy(priority=20) //default value is 1000
  void onShutdownPriority() {
    // close resources in a specific order
    ...
  }
  ...
AutoCloseable and Closeable
Both java.lang.AutoCloseable and java.io.Closeable are treated as PreDestroy
lifecycle methods. Types that implement these interfaces do not need to annotate the close() method,
it will automatically be treated as if it had a @PreDestroy and executed when the bean scope is closed.
@Singleton
public class CoffeeQueue implements AutoCloseable {

  /**
   * Automatically treated as a PreDestroy method.
   */
  @Override
  public void close() {
    // close resources
    ...
  }
  ...
Shutdown hook
When BeanScope is created, you can specify if it should register a JVM shutdown hook.
This is fired when the JVM is shutdown to invoke the PreDestroy methods. Otherwise,
PreDestroy methods are closed when the BeanScope is closed.
BeanScope beanScope =
  BeanScope.builder()
      .shutdownHook(true) // create with JVM shutdown hook
      .build()
Conditional Beans
@RequiresBean
Put @RequiresBean on a @Factory class, @Factory method,
or @Singleton class so that a bean will only be registered when the conditions are met.
@Singleton
@RequiresBean(Kindling.class)
@RequiresBean(Cinders.class)
public class Fire {
   ...
}
@RequiresProperty
Put @RequiresProperty on a @Factory class, @Factory method,
or @Singleton class so that a bean will only be registered when the conditions are met.
@Singleton
@RequiresProperty("unkindled")
@RequiresProperty(value = "fire", notEqualTo = "burning")
public class Dark {
   ...
}
@Profile
When the property avaje.profiles is set, use @Profile on a @Factory class, @Factory method,
or @Singleton class to ensure that a bean will only be registered when the given wiring profiles are present/absent.
@Singleton
@Profile("ds2")
public class BearerOfTheCurse {
   ...
}
ConfigPropertyPlugin
To test property/profile conditions, an instance of io.avaje.inject.spi.ConfigPropertyPlugin is loaded via java.util.ServiceLoader.
If there are no ConfigPropertyPlugin found, a default implementation will be provided that uses System.getProperty(String) and System.getenv(String).
Avaje Config provides a ConfigPropertyPlugin, so when it's detected in the classpath, it will be used to test the property conditions.
You can provide your own implementation of ConfigPropertyPlugin via service loader if you want to use your own custom testing of property condition.
Condition Meta-Annotations
If multiple beans require the same combination of requirements, you can define a meta-annotation with the requirements:@RequiresBean(Flame.class)
@RequiresBean(value = Kindling.class, missing = Dark.class)
@RequiresProperty(value = "flame.state", notEqualTo = "fading")
public @interface FirstFlame {}
@Singleton
@FirstFlame
@RequiresProperty(value = "flame.state", notEqualTo = "fading")
public class Light {
   ...
}
@FirstFlame
@RequiresProperty(value = "abyss", equalTo="sealed")
public @interface AgeOfFire {}
@Singleton
@AgeOfFire
// AgeOfFire effectively adds the following conditions
// @RequiresProperty(value = "abyss", equalTo="sealed")
// @RequiresBean(Flame.class)
// @RequiresBean(value = Kindling.class, missing = Dark.class)
// @RequiresProperty(value = "flame.state", notEqualTo = "fading")
public class Sun {
   ...
}
Configuration Requirements
The conditional annotations are pretty flexible and can be used for a variety of use cases. The following table summarizes some common uses:
| Requirement | Example | |
|---|---|---|
| One or more beans should be present | @RequiresBean({DataSource.class, DBClient.class}) |
|
| One or more beans should not be present | @RequiresBean(missing = {DataSource.class, DBClient.class}) |
|
| Beans with the given names/qualifiers should be present | @RequiresBeans(qualifiers = {"blue", "green"}) |
|
| @PropertyRequires | ||
| A given property exists | @RequiresProperty("spinning") |
|
| Given properties don't exist | @RequiresProperty(missing = {"spiral","nemesis"}) |
|
| Given property equals a value | @RequiresProperty(value = "drill", equalTo = "spin-on") |
|
| Given property does not equal a value | @RequiresProperty(value = "spirit", notEqualTo = "broken") |
|
| @Profile | ||
| Any of the given profiles are set | @Profile({"sword","bow"}) |
|
| Given profiles are not set | @Profile(none = {"malice","gloom"}) |
|
| All the given profiles must be set | @Profile(all = {"light","dragon"}) |
|
| Given property does not equal a value | @Profile(value = "spirit", notEqualTo = "broken") |
|
Aspect Oriented Programming
This library has several constructs that support Aspect Oriented Programming.
@Aspect
Create an annotation class and annotate it with @Aspect to define an aspect annotation.
To control the execution order of multiple aspects, use the ordering property of the @Aspect.
To import an existing annotation, use @Aspect.Import.
@Aspect(ordering = 1) // Determines priority among other aspects
@Target(ElementType.METHOD)
@Retention(RetentionPolicy.RUNTIME)
public @interface MyAround {

  String name() default "";
}
For this aspect to work, a corresponding AspectProvider must be wired into the scope.
The AspectProvider should be a @Singleton or @Component that provides a MethodInterceptor.
(Which will intercept the method call).
@Singleton
public class MyAroundAspect implements AspectProvider<MyAround> {

  @Override
  public MethodInterceptor interceptor(Method method, MyAround around) {
    return new ExampleInterceptor();
  }

  static class ExampleInterceptor implements MethodInterceptor {
    // MethodInterceptor interception method
    @Override
    public void invoke(Invocation invoke) throws Throwable {
      System.out.println("before args: " + Arrays.toString(invoke.arguments()) + " method: " + invoke.method());
      try {
        invoke.invoke();
      } finally {
        System.out.println("after");
      }
    }
  }
}
With the provider set, use the created aspect annotation on a class/method to intercept calls.
@Singleton
public class ExampleService {

  @MyAround
  public String example(String param0, int param1) {
    return "other " + param0 + " " + param1;
  }
}
Avaje will generate a proxy class that will run the aspects for every annotated method.
@Proxy
@Generated("io.avaje.inject.generator")
public class ExampleService$Proxy extends ExampleService {

  private final MyAroundAspect myAroundAspect;

  private Method example0;
  private MethodInterceptor example0MyAround;

  public ExampleService$Proxy(MyAroundAspect myAroundAspect) {
    super();
    this.myAroundAspect = myAroundAspect;
    try {
      example0 = ExampleService.class.getDeclaredMethod("example", String.class, int.class);
      example0MyAround = myAroundAspect.interceptor(example0, example0.getAnnotation(MyAround.class));
    } catch (Exception e) {
      throw new IllegalStateException(e);
    }
  }

  @Override
  public String example(String param0, int param1) {
    var call = new Invocation.Call<>(() -> super.example(param0, param1))
      .with(this, example0, param0, param1);
    try {
      example0MyAround.invoke(call);
      return call.finalResult();
    } catch (InvocationException e) {
      throw e;
    } catch (Throwable e) {
      throw new InvocationException(e);
    }
  }
}
@AOPFallback
@AOPFallback registers a recovery method for an aspect method invocation.
Recovery methods must return the same type as the target method and may have 4 options for arguments:
- zero arguments
- one
Throwableargument - all the target method's arguments
- the target method's arguments +
Throwable.
@Singleton
class ExampleService {

  @MyAround
  public String example(String param0, int param1) {
    throw new IllegalStateException();
  }

  @AOPFallback("example")
  public String fallback(String param0, int param1, Throwable e) {
    return "fallback-" + param0 + ":" + param1 + ":" + e.getMessage();
  }
}
Inside our method interceptor, use Invocation#invokeRecoveryMethod to recover from an exception.
@Singleton
public class MyAroundAspect implements AspectProvider<MyAround> {

  //rest of aspect provider...

  static class ExampleInterceptor implements MethodInterceptor {
    // MethodInterceptor interception method
    @Override
    public void invoke(Invocation invoke) throws Throwable {
      System.out.println("before args: " + Arrays.toString(invoke.arguments()) + " method: " + invoke.method());
      try {
        invoke.invoke();
      } catch(Exception ex) {
        //recover
        invoke.invokeRecoveryMethod(ex);
      } finally {
        System.out.println("after");
      }
    }
  }
}
Scopes
Default Scope
All beans are instantiated within a scope. Beans annotated with @Singleton
are in the "default scope".
public class App {
  public static void main(String[] args) {

    // create all the beans in the "default scope"
    BeanScope scope = BeanScope.builder().build();

    SomeObject obj = scope.get(SomeObject.class);
  }
}
When avaje-inject builds the "default scope" it will service load all the default scope modules in the classpath (i.e. wire all the "default scope" modules in the classpath together into the BeanScope).
Prototype Scope
Beans annotated with @Prototype are created on demand when requested. See also: @Prototype.
Test scope
Test scope is a special scope used for testing. It effectively provides default dependencies to use for all tests.
Refer to Testing - Test Scope for more details.
Request Scope - @Controller
When using avaje-http we annotate controllers with @Controller.
avaje-inject will detect when controllers have a request scope dependency and automatically
make them request scoped.
For the following example, the ContactController has a dependency on Jex Context. This means this controller must use request scope.
// Automatically becomes request scoped
//  ... because Jex Context is a dependency
//  ... controller instantiated per request

@Controller("/contacts")
class ContactController {

  private final ContactService contactService;

  private final Context context; // Jex Context

  // Inject Jex context via constructor
  @Inject
  ContactController(Context context, ContactService contactService) {
    this.context = context;
    this.contactService = contactService;
  }

  @Get("/{id}")
  Contact getById(long id) {
    // use the Jex context ...
    var fooCookie = context.cookieStore("foo");
    ...
  }
}
@Scope - custom scopes
We can define our own custom scopes. To do this we create an annotation that is meta-annotated with @Scope.
We use this custom scope annotation rather than @Singleton.
Custom scopes can depend on each other and also externally defined objects, thus allowing a hierarchy of scopes to be modelled.
Each scope results in the generation of a module class that can be added to a BeanScope using the modules method.
The constructor of the module class takes the externally defined dependencies if defined. This makes it easy to partially adopt Avaje Inject
where we want some objects can be built manually by your own code and then provided to the DI scope.
For simple cases we don't need to use custom scopes. We can just annotate classes with @Singleton and
use the default scope.
Example: Custom Scope
Step 1: Define the custom scope annotation
@Scope
public @interface MyCustomScope {
}
Step 2: Use the custom scope annotation (rather than @Singleton)
@MyCustomScope
public class SomeObject {

}
Step 3: Build BeanScope with the custom scope
public class App {
  public static void main(String[] args) {

    BeanScope scope = BeanScope.builder()
      .modules(new MyCustomScopeModule())
      .build();

    SomeObject obj = scope.get(SomeObject.class);
  }
}
Custom Scope Dependencies
Custom scopes can have dependencies on other scopes or externally supplied beans.
We specify these dependencies using @InjectModule(requires = ...).
Custom scope beans are allowed to depend on any bean in the "default scope" implicitly. We do not need to specify a dependency for custom scoped beans to use default scoped beans.
In the following example MyCustomScope has a dependency on NonDIConstructedObject.
@Scope
@InjectModule(requires = {NonDIConstructedObject.class})
public @interface MyCustomScope {
}

@MyCustomScope
public class SomeObject {
  public SomeObject(NonDIConstructedObject obj) { ... }
}

public class App {
  public static void main(String[] args) {

    BeanScope scope = BeanScope.builder()
      // custom module with an external dependency
      .modules(new MyCustomScopeModule(new NonDIConstructedObject()))
      .build();

    SomeObject obj = scope.get(SomeObject.class);
  }
}
To make one scope depend on another, just put the depended-on scope's annotation into the @InjectModule(requires = { .. })
list, then call the parent method of the BeanScope to chain them together.
Custom scope parent child hierarchy
When using custom scopes we can create a hierarchy of scopes. When we create the BeanScope
we can use parent() to specify a parent scope.
// create a parent scope
try (final BeanScope parentScope = BeanScope.builder().build()) {

  // we can use this scope
  final var coffeeMaker = parentScope.get(CoffeeMaker.class);

  // external dependency for a custom scope
  LocalExt ext = new LocalExt();

  // create a child scope
  try (BeanScope childScope = BeanScope.builder()
    .parent(parentScope) // specify the parent
    .modules(new MyCustomModule(ext)) // the custom scope(s)
    .build()) {

    // use the child scope
    ...

  }
}
Events
@Observes/@ObservesAsync
Put @Observes/@ObservesAsync on the event parameter of an observer method. An observer method is a non-abstract method of a managed bean class.
The priority member of the annotations controls the priority of the observer.
@Singleton
class LoginObserver {
 public void afterLogin(@Observes(priority=1) LoggedInEvent event) { ... }
}
Each observer method must have exactly one event parameter, of the same type as the event type
it observes. Event qualifiers may be declared by annotating the event parameter with a qualifier such as @Named or any custom qualifier annotations.
When searching for observer methods for an event, the
container considers the type and qualifiers of the event parameter.
@Singleton
class LoginObserver {
  public void afterLogin(@Observes @Named("qualified") LoggedInEvent event) { ... }
}
If the event parameter does not explicitly declare any qualifier, the observer method observes events with no qualifier.
The event parameter type may contain a type variable or wildcard.
Bean Injection
In addition to the event parameter, observer methods may declare additional parameters, which may declare qualifiers. These additional parameters are beans that will be injected when an event has occurred.
@Singleton
class LoginObserver {
  public void afterLogin(@Observes LoggedInEvent event, @Manager User user) { ... }
}
Event Producers
Event producers fire events either synchronously or asynchronously using an instance of the parameterized Event interface. An instance of this interface is obtained by injection.
@Singleton
public class CustomEventSender {
  @Inject @Named("qualified") Event<CustomEvent> customEvent;
}
If not already present, an event publisher is generated which can send events to all registered observers for the given qualifier. If no qualifier annotations are present, the publisher will default to sending to unqualified observers.
@Component
@Named("qualified")
@Generated("avaje-inject-generator")
public class CustomEvent$Publisher extends Event<CustomEvent> {

  private static final Type TYPE = CustomEvent.class;

  public CustomEvent$Publisher(ObserverManager manager) {
    super(manager, TYPE, "qualified");
  }
}
Sending Events
A producer raises events by calling the fire() or fireAsync() methods of the Event interface, passing the event object:
@Component
public class EventService {

  Event<CustomEvent> eventPublisher;

  public EventService(Event<CustomEvent> eventPublisher) {
    this.eventPublisher = eventPublisher;
  }

  void process(){
    CustomEvent event = //...
    eventPublisher.fire(event);
    eventPublisher.fireAsync(event);
  }
}
This particular event will only be delivered to (a)synchronous observer methods that:
- Have an event parameter of
CustomEvent - Specifies no qualifiers.
fire() simply calls all the synchronous observer methods, passing the event object as the value of the event parameter. If any observer method throws an exception, the container stops calling observer methods, and the exception is rethrown by the fire() method.
fireAsync() returns immediately and all the resolved asynchronous observers are notified in
one or more different threads.
If any observer method throws an exception, the container will suppress it and notify remaining observers.
The resulting CompletionStage will then finish exceptionally with CompletionException containing all previously suppressed exceptions.
Applying qualifiers to events
Qualifiers can be applied to an event in one of two ways:
- By annotating the
Eventinjection point - By passing the stringified qualifier to the fire/fireAsync methods of Event.
Specifying the qualifiers at the injection point is by far the simpler option:
@Component
public class EventService {

  Event<CustomEvent> eventPublisher;

  public EventService(@Red Event<CustomEvent> eventPublisher) {
    this.eventPublisher = eventPublisher;
  }
}
Unless overridden by a manually specified qualifier, the above injected Event's fire/fireAsync methods will by defaul send with the Red qualifier. The event is delivered to every observer method that:
- Have an event parameter of
CustomEvent - Specifies the @Red qualifier.
The below example shows how to send events with a dynamic qualifier
@Component
public class EventService {

  Event<CustomEvent> eventPublisher;

  public EventService(@Red Event<CustomEvent> eventPublisher) {
    this.eventPublisher = eventPublisher;
  }
  void process(){
    CustomEvent event = //...
    eventPublisher.fire(event, "Green"); //overrides the default Red qualifier
    eventPublisher.fireAsync(event, "Blue");
  }
}
Modules
To wire all the beans into a scope, avaje-inject generates module classes that run all the constructors/factory methods and adds all beans to the scope.
Single Module Apps
When we are wiring dependencies that are all part of a single jar/module then we don't really care about module ordering. All the dependencies that are being injected are known and provided by the same jar/module or provided externally.
requires - external dependency
@InjectModule(requires = ...) can specify an external dependency that will
be programmatically provided. This prevents compilation errors when the processor cannot find the dependency at compile-time. See also @External.
// at compile time, allow injection of MyExternalDependency
// ... even though it doesn't exist in this module
@InjectModule(requires = MyExternalDependency.class)
When creating the BeanScope we provide the externally created dependencies using
bean(). These external dependencies are then injected where needed.
MyExternalDependency myExternal = ...;

// create with an externally provided dependency
final BeanScope scope = BeanScope.builder()
  .bean(MyExternalDependency.class, myExternal)
  .build();
ignoreSingleton
We use @InjectModule(ignoreSingleton = true) in order to specify that we want
avaje-inject to ignore standard JSR-330 @Singleton - with the expectation
that another DI library (like Guice) is being used and we want avaje-inject to co-exist
and ignore anything annotated with @Singleton.
@InjectModule(ignoreSingleton = true)
When using ignoreSingleton = true we use @Component instead of
using @Singleton.
Multi-module Apps
When wiring dependencies that span multiple jars/modules, avaje provides control over the order in which the modules are wired.
The processor provides this control with @InjectModule and the use of provides, and requires
or requiresPackages.
Example - modular coffee app
See example source at avaje-inject-examples / modular-coffee-app
module 1 - coffee-heater
@InjectModule(name="coffee-heater", provides = Heater.class)
module 2 - coffee-pump
@InjectModule(name = "coffee-pump", requires = Heater.class, provides = Pump.class)
This module expects Heater to be provided by another module. In effect, the
coffee-heater module must be wired before this module, and it provides the Heater
that is required when we wire the coffee-pump module.
module 3 - coffee-main
@InjectModule(name = "coffee-main", requires = {Heater.class, Pump.class})
This module expects Heater and Pump to be provided by other module(s).
It needs other modules to be wired before and for those modules to provide the Heater and Pump.
avaje-inject determines the order in which to wire the modules based on provides, requires. In this example
it needs to wire the modules in order of: coffee-heater, coffee-pump and then coffee-main. As the modules are wired, the beans from any previously wired modules are
available to the module being wired.
requires vs requiresPackages
We use either requires OR requiresPackages. Using requires is nice in that
we explicitly list each external dependency that the module requires BUT this can get onerous when this
is a really large list. In this case we can use requiresPackages instead and that makes
the assumption that any dependency under those packages will be provided. So using requiresPackages
is less strict but more practical when there is a lot of module dependencies.
When we use requiresPackages that means that provides can similarly specify
a class at the top level, and we don't need to list ALL the provided dependencies.
autoRequires
avaje-inject can also automatically read the classpath/maven dependencies at compile-time to find all the modules and automatically determine the requires dependencies.
This works fine in most cases, but when you are using the annotation processor with a java 9+ modular project or defined as an annotationProcessorPath in the maven-compiler-plugin, you will need to add the avaje-inject-maven-plugin. (For Gradle, use the avaje-inject-gradle-plugin)
<plugin>
  <groupId>io.avaje</groupId>
  <artifactId>avaje-inject-maven-plugin</artifactId>
  <version>${avaje.inject.version}</version>
  <executions>
    <execution>
      <phase>process-sources</phase>
      <goals>
        <goal>provides</goal>
      </goals>
    </execution>
  </executions>
</plugin>
This generates 2 files in the target folder before the code is compiled: target/avaje-module-dependencies.csv and target/avaje-plugin-provides.txt.
These files contain all the metadata for all the modules and plugins provided by all external modules on the classpath/maven dependencies. The annotation processor then reads the files at compile time and will not throw a compilation error if these components are required dependencies.
Shading Note
As avaje uses the ServiceLoader to load AvajeModule instances, be sure to have the following configuration set when using the maven shade plugin on multi-module projects.
<plugin>
  <groupId>org.apache.maven.plugins</groupId>
  <artifactId>maven-shade-plugin</artifactId>
  <configuration>
    <transformers>
      <transformer implementation="org.apache.maven.plugins.shade.resource.ServicesResourceTransformer" />
    </transformers>
  </configuration>
</plugin>
This ensures that the META-INF/services files in the shaded dependencies are merged into the UberJar. With all service entries merged, avaje can discover and load all available modules.
@InjectModule
name
Give the module an explicit name. Otherwise, it is derived from the top level package.
ignoreSingleton
Set this to true in order to specify that we want
avaje-inject to ignore standard JSR-330 @Singleton with the expectation
that another DI library (like Guice) is being used and we want avaje-inject to co-exist
and ignore anything annotated with @Singleton.
provides
List the classes that this module provides, this is usually determined automatically, but it can be manually overridden to change wiring order.
@InjectModule(name = "feature-toggle", provides = FeatureToggle.class)
requires
Defines dependencies that the modules depends on that are provided by another module or manually.
@InjectModule(name = "job-system", requires = FeatureToggle.class)
In effect this allows the job system components to depend on FeatureToggle with the expectation that
it will be supplied by another module or supplied manually.
requiresPackages
If we have a LOT of dependencies provided by another module specifying each of these explicitly in requires
can get verbose. Instead of doing that we can use requiresPackages to define top level packages, any
dependency required under top level packages will be expected to be provided by another module.
// anything at or below the package of Feature is provided externally
@InjectModule(name = "job-system", requiresPackages=Feature.class)
strictWiring
Optimizes multi-module wiring by enforcing wiring checks at compile-time and generating a preset wiring plan. Will cause the generator to throw a descriptive
compilation error if all inter-module InjectModule#requires dependencies are not satisfied at compile time.
Set true if your project:
- Is not itself consumed by another project/library
- Does not dynamically provide beans at runtime
@InjectModule(strictWiring =true)
avaje-inject uses provides, requires and requiresPackages to determine the order in which the modules should be created and wired. avaje-inject finds all the modules in the classpath/modulepath (via Service loader) and then orders the modules based on provides, requires, requiresPackages. In the example above the "feature-toggle" module are wired first, and then the beans it contains are then available when wiring the "job-system".
Plugins
If you want to execute code when creating a bean scope, you can implement the InjectPlugin SPI.
Typically, a plugin might provide a default dependency via BeanScopeBuilder.provideDefault().
Plugins implement the io.avaje.inject.spi.InjectPlugin interface, which extends the
io.avaje.inject.spi.InjectSPI interface, found and registered via ServiceLoader.
This means they have a file at src/main/resources/META-INF/services/io.avaje.inject.spi.InjectSPI
which contains the fully qualified class name of the implementation.
Below is an example plugin that provides a default ExampleBean instance.
//this is read at compile-time to tell the avaje generator what bean classes are provided
PluginProvides({ExampleBean.class})
ublic final class DefaultBeanProvider implements io.avaje.inject.spi.InjectPlugin {

 //this is called at runtime to tell avaje beanscope what bean classes this plugin provides
 @Override
 public Type[] provides() {
   return new Type[]{ExampleBean.class};
 }

 // this is called at runtime before any beans are wired
 @Override
 public void apply(BeanScopeBuilder builder) {
   //you can access the scope's wiring properties to help configure your plugin
   var props = builder.propertyPlugin();

   //provide a default bean
   builder.provideDefault(ExampleBean.class, ExampleBean::new);
 }
}
Testing
Unit Testing
When unit testing we are focused on the object under testing and its dependencies.
In the test setup, code will create the object under test along with its dependencies.
Mockito programmatic style
// setup
final Pump pump = mock(Pump.class);
final Grinder grinder = mock(Grinder.class);
CoffeeMaker coffeeMaker = new CoffeeMaker(pump, grinder);

// act
coffeeMaker.makeIt();

verify(pump).pumpSteam();
verify(grinder).grindBeans();
Mockito JUnit5 Extension
Mockito provides a JUnit 5 extension MockitoExtension which can be used
with JUnit @ExtendWith. With this extension we can annotate fields with
@Mock, @Spy and @Captor. Again, this is all
Mockito - no avaje inject is used here.
@ExtendWith(MockitoExtension.class)
class CoffeeMakerTest {

  @Mock Pump pump;
  @Mock Grinder grinder;

  @Test
  void extensionStyle() {

    // setup
    CoffeeMaker coffeeMaker = new CoffeeMaker(pump, grinder);

    // act
    coffeeMaker.makeIt();

    verify(pump).pumpSteam();
    verify(grinder).grindBeans();
  }
}
avaje-inject is NOT used in the above unit tests (as expected). We will see below that avaje-inject
provides a JUnit extension similar to the Mockito one and that uses the Mockito annotations
@Mock, @Spy, @Captor and also adds @Inject.
Component Testing
Component testing is where we look to run tests that use most of the objects with their real behaviour with less mocked / stubbed behaviour. With component testing we are looking to test a scenario / piece of functionality with minimal to no mocking.
The rise and adoption of test docker containers has meant that it is now possible to test significant portions of an application without mocking or stubbing resources like databases and messaging.
- Often uses test docker containers for databases, message queues etc
- Use Test scope to provide "default" dependencies (e.g. set up to use the local docker containers)
- Get avaje-inject to "wire" the objects used in the test scenario
- Unlike unit tests, test a scenario with little to no mocking or stubbing
Dependency
Add avaje-inject-test as a test dependency.
<dependency>
  <groupId>io.avaje</groupId>
  <artifactId>avaje-inject-test</artifactId>
  <version>${avaje.inject.version}</version>
  <scope>test</scope>
</dependency>
@InjectTest
avaje-inject provides a JUnit 5 extension via @InjectTest.
When a test is annotated with @InjectTest then avaje-inject will be used to setup the
test using @Inject as well as mockito's @Mock, @Spy, @Captor.
With @InjectTest avaje-inject will build a BeanScope with the appropriate mockito mocks and spies and inject back into the test the appropriate objects out of the BeanScope.
@InjectTest
class CoffeeMakerTest {

  @Mock Pump pump;
  @Mock Grinder grinder;
  // Get this OUT of the DI BeanScope
  @Inject CoffeeMaker coffeeMaker;
  //When a field annotated @Inject has an initialized value, it's wired INTO the DI BeanScope
  @Inject BeanService myTestDouble = new BeanService();

  @Test
  void extensionStyle() {

    // act
    coffeeMaker.makeIt();

    verify(pump).pumpSteam();
    verify(grinder).grindBeans();
  }
}
The above test using @InjectTest is equivalent to the test below
that programmatically creates a BeanScope and performs the same test.
@Test
void programmaticStyle() {

  try (var beanScope = TestBeanScope.builder()
    .forTesting()
    .mock(Pump.class)
    .mock(Grinder.class)
    .build()) {

    CoffeeMaker coffeeMaker = beanScope.get(CoffeeMaker.class);

    // act
    coffeeMaker.makeIt();

    verify(beanScope.get(Pump.class)).pumpSteam();
    verify(beanScope.get(Grinder.class)).grindBeans();
}
If we look closely at the test above, we will see the use of TestBeanScope.builder()
rather than the usual BeanScope.builder(). We use TestBeanScope to automatically use
the "test scope" if it exists.
@Setup
We can use a method annotated with @Setup as an alternative to mock annotations to provide mocks to the test bean context.
@InjectTest
class Inject_Test {
  // calls repo and adds hello string
  @Inject
  Service service;

  Repo repoDouble;

  //use setup to add/replace beans in the context before tests
  @Setup
  void setup(BeanScopeBuilder builder) {
    repoDouble = mock(Repo.class);
    when(repoDouble.get()).thenReturn("MockedViaSetupMethod");
    builder.bean(Repo.class, repoDouble);
  }

  @Test
  void test() {
    assertEquals("MockedViaSetupMethod+hello", service.process());
  }
}
@Named and @Qualifier
We can use @Named and qualifiers as needed with @Mock, @Spy, and @Inject like below.
@Mock @Blue Store blueStore;

@Mock @Named("red") Store redStore;
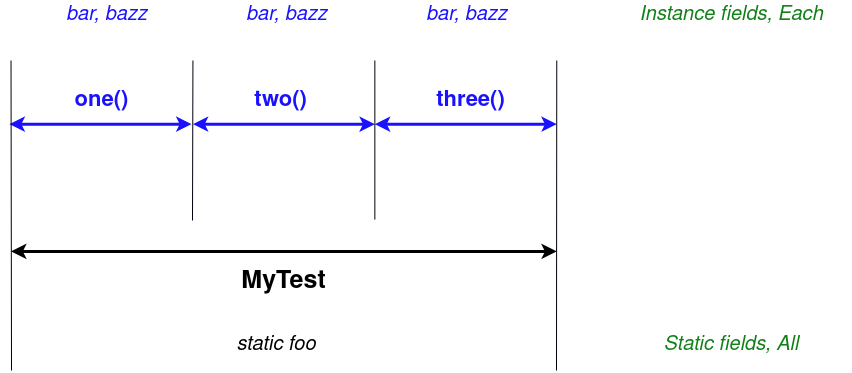
Static fields, Instance fields
With @InjectTest we can inject into static fields and non-static fields.
Under the hood, these map to BeanScopes that are created and used to populate these fields in the tests.
static fields - Junit All
With static fields there is an underlying BeanScope that is created and used for all tests in the test class. In the example below, the static Foo is in that BeanScope.
This matches Junit5 All - @BeforeAll, @AfterAll etc.
This BeanScope is created and used for all tests that run for that test class. This scope will be closed after all tests for the class have been run. The "global test scope" (if defined) will be the parent bean scope.
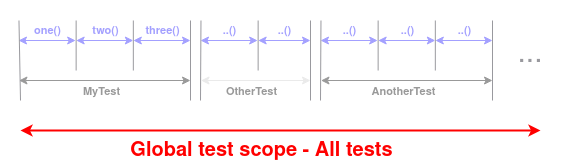
non-static fields - Junit Each
For non-static fields, there is a BeanScope that is created for these. In the example
below Bar and Bazz are in that BeanScope. With the 3 test methods one(), two(), three()
this BeanScope is created (and closed) for each test so 3 times.
This matches Junit5 Each - @BeforeEach, @AfterEach etc.
This BeanScope is created for each test and closed after that test has been run. It can have a parent bean scope of either the "test static scope" if defined for that test, or the "global test scope" (if defined).
@InjectTest
class MyTest {

  static @Mock Foo foo;
  @Mock Bar bar;
  @Inject Bazz bazz;

  @Test
  void one() {
    ...
  }

  @Test
  void two() {
    ...
  }

  @Test
  void three() {
    ...
  }

}
The above MyTest runs 3 tests, one(), two(), and three().
Static Foo field is wired once and the same foo instance would be used for ALL three tests.
Instance Bar, Bazz fields are wired for each of the three tests - they are wired 3 times.
This can be represented by the diagram below. Bar, Bazz are created and injected 3 times. Static Foo is created and injected once.
The above test can be programmatically written as below. In the code below, we see:
- staticScope that spans all the tests. Created in
beforeAll()and closed inafterAll(). - instanceScope that is created in
beforeEach()and closed inafterEach()
class MyTest {

  // static fields
  static @Mock Foo foo;

  // instance fields
  @Mock Bar bar;
  @Inject Bazz bazz;

  static BeanScope staticScope; // "static forAll" scope
  BeanScope instanceScope    // "instance forEach" scope

  @BeforeAll
  static void beforeAll() {
    staticScope = TestBeanScope.builder()
        .forTesting()
        .mock(Foo.class)
        .build()
    foo = staticScope.get(Foo.class);
  }

  @AfterAll
  static void afterAll() {
    staticScope.close()
  }

  @BeforeEach
  void beforeEach() {
    instanceScope = TestBeanScope.builder().parent(staticScope)
        .forTesting()
        .mock(Bar.class)
        .build()
    bar = instanceScope.get(Bar.class);
    bazz = instanceScope.get(Bazz.class);
  }

  @AfterEach
  void afterEach() {
    instanceScope.close()
  }


  @Test
  void one() {
    ...
  }

  @Test
  void two() {
    ...
  }

  @Test
  void three() {
    ...
  }
}
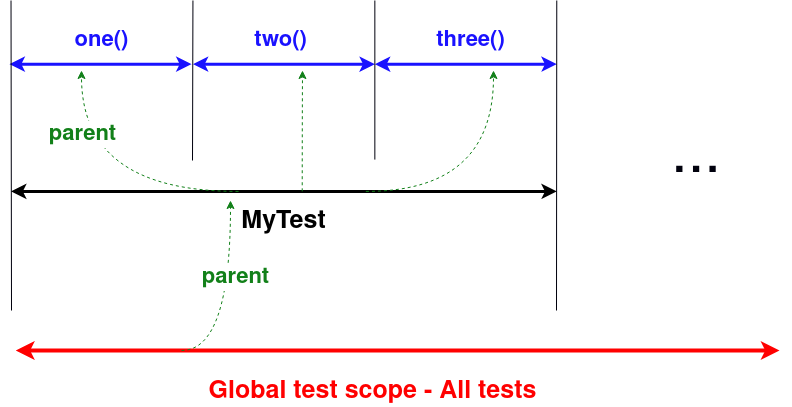
Parent child hierarchy
When using @InjectTest we get a 3 level parent child hierarchy of BeanScope.
- Global test scope that spans ALL tests. This is detailed in the next section.
- Static/All BeanScope - when there are static fields to @Inject, @Mock or @Spy.
- Instance/Each BeanScope - when there are instance fields to @Inject, @Mock or @Spy.
All 3 scopes
When we have all 3 scopes they form a parent child hierarchy as per the diagram below. The "global test scope" is the parent of the "static/all scope". The "static/all scope" is the parent of each "instance/each scope".
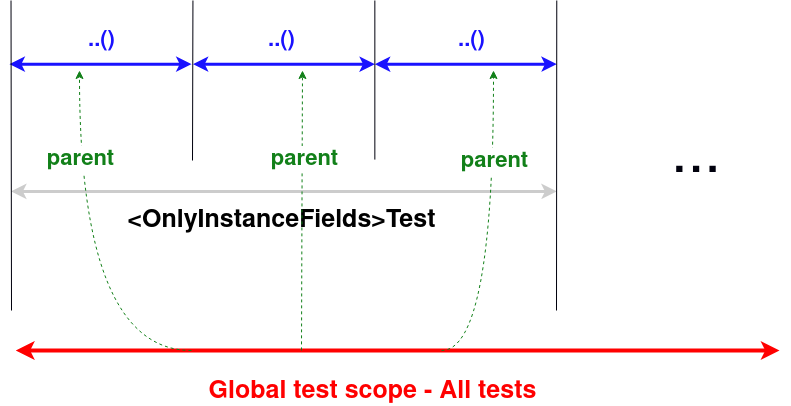
Only instance fields
When a test only has instance fields with @Inject, @Mock or @Spy then the global test scope (if defined) is the parent of the instance/each scopes.
In this case, @InjectTest detects that there are no static fields to wire and will not create a BeanScope for the
static/all scope.
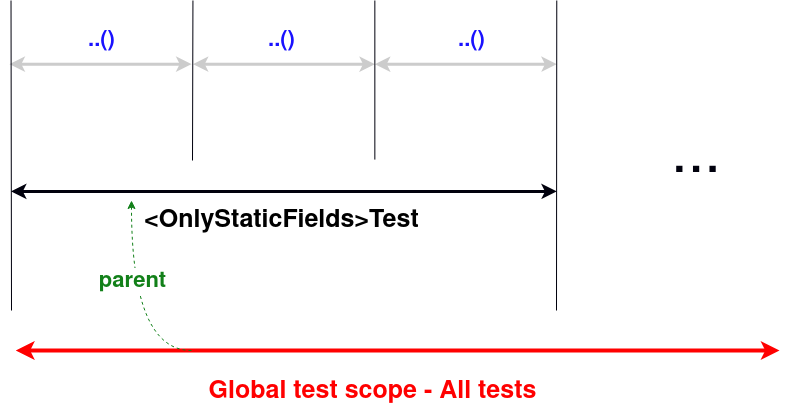
Only static fields
When a test only has static fields with @Inject, @Mock or @Spy then the global test scope (if defined) is the parent of the static/all scope. This static/all scope is used by all the tests that run.
In this case, @InjectTest detects that there are no instance fields to wire and will not create a BeanScope for
each instance/each scope.
@TestScope - global test scope
When we use @TestScope we create a special bean scope used for testing that spans ALL TESTS.
It effectively provides default dependencies to use for ALL tests. As such we can think of it as the
"global test scope".
Under the hood, the global test BeanScope is created when junit starts, this test BeanScope holds all the beans
that we put in @TestScope and this scope is used as the parent BeanScope for @InjectTest
tests.
Step 1: Add @TestScope
In src/test create a factory bean that we dedicate to creating test scope dependencies.
Put @TestScope on this factory bean, the beans this factory creates are in our "test scope"
and will be wired into tests that use @InjectTest.
Example - AmazonDynamoDB
In the example below, our application has a dependency on AmazonDynamoDB. For testing
purposes, we want all tests to default to using a test scoped AmazonDynamoDB instance that we set
up to use a localstack docker container.
Example: avaje-inject-examples - hello-dynamodb - MyTestConfiguration.java
/**
 * All beans wired by this factory will be in the "global test scope".
 */
@TestScope
@Factory
class MyTestConfiguration {

  /**
   * An 'extra' dependency for testing - a docker container running DynamoDB.
   */
  @Bean
  LocalstackContainer dynamoDBContainer() {
    LocalstackContainer container = LocalstackContainer
      .builder("0.14.2")
      .services("dynamodb") // e.g. "dynamodb,sns,sqs"
      .build();
    container.start();
    return container;
  }

  /**
   * Default to using this AmazonDynamoDB instance in our tests.
   * This client is setup to use the localstack docker container.
   */
  @Bean
  AmazonDynamoDB dynamoDB(LocalstackContainer container) {
    AmazonDynamoDB dynamoDB = container.dynamoDB();
    createTable(dynamoDB);
    return dynamoDB;
  }
}
Any component that has AmazonDynamoDB injected into it, will now have the above AmazonDynamoDB instance which is set up to talk to the localstack docker container DynamoDB.
Step 2: @InjectTest
Annotate the test class with @InjectTest.
The component tests can inject AmazonDynamoDB directly, or typically inject a component that depends on AmazonDynamoDB and these will use "our test scoped AmazonDynamoDB instance".
@InjectTest
class DynamoDbComponentTest {

  /**
   * The test scoped instance.
   */
  @Inject AmazonDynamoDB dynamo;

  /**
   * More typical, a component that depends on AmazonDynamoDB.
   */
  @Inject MyDynamoClient client;

}
The "test scoped bean" is by default wired but each test can override this using @Mock or @Spy.
For that test, the mock or spy is used and wired instead of the "test scoped bean".
@InjectTest
class OtherComponentTest {

  /**
   * Use this instance for this test.
   */
  @Mock AmazonDynamoDB mockDynamo;

  /**
   * Now wired with mockDynamo for this test.
   */
  @Inject MyDynamoClient client;

}
Purposes of Test scope beans
Test scope beans generally have one of 3 purposes.
1. Extra bean
For testing purposes we want to create an extra bean. For example, the LocalStackContainer that starts a docker container.
2. Default bean
We want most of the tests to use a bean (the default one we want to use in tests). For example, we want components to use the AmazonDynamoDB instance that will talk to the local docker container.
3. Replacement
Say we have a remote API (e.g. Rest call to GitHub). We don't want any component tests to actually make real calls to GitHub. Instead, we want to have a default stub response and have that as the default. This is similar to (2) but more that the default is more like a stub test double.
@InjectTest is syntactic sugar for junit5 @ExtendWith(InjectExtension.class)
Programmatic testing
As an alternative to using InjectExtension, we can write component tests programmatically. For programmatic style component testing we create a BeanScope and define test doubles that we want to use in place of the real things.
TestBeanScope.builder()
For tests we should always use TestBeanScope.builder() rather than BeanScope.builder().
By using TestBeanScope.builder() it will use the global test scope as a parent bean scope - we
generally always want to do that for tests.
If we never use the global test scope then we can use BeanScope.builder().
forTesting()
With the bean scope builder we use forTesting() to give us extra methods for ease of using
mockito mocks and spies. Use mock() to specify a dependency to be a Mockito mock.
Use spy() to get a dependency to be a Mockito spy. We can use bean()
to supply any sort of test double we like.
@Test
void using_mock() {

  try (BeanScope scope = TestBeanScope.builder()
    .forTesting()
    .mock(Pump.class)
    .mock(Grinder.class)
    .build()) {

    // act
    CoffeeMaker coffeeMaker = scope.get(CoffeeMaker.class);
    coffeeMaker.makeIt();

    verify(pump).pumpSteam();
    verify(grinder).grindBeans();
}
@Test
void using_spy() {

  try (BeanScope context = TestBeanScope.builder()
    .forTesting()
    .spy(Pump.class)
    .build()) {

    CoffeeMaker coffeeMaker = context.get(CoffeeMaker.class);
    assertThat(coffeeMaker).isNotNull();
    coffeeMaker.makeIt();

    Pump pump = context.get(Pump.class);
    verify(pump).pumpWater();
  }
}
Why does avaje-inject exist?
Short History of DI on the JVM
For a short history of DI on the JVM see below and refer to PicoContainer - inversion of control history
- 1998 - Avalon
- 2003 - Spring and PicoContainer
- 2005 - Guice
- 2009 - JSR 330 javax.inject
- 2013 - Dagger1
- 2015 - Dagger2
- 2018 - Micronaut
- 2018 - Avaje-Inject (dinject)
- 2019 - Quarkus
Stefano Mazzocchi popularized the term Inversion of Control and the Apache Avalon project starts.
Spring and PicoContainer lead the initial adoption of DI. Java 5 came out with new language features which included annotations and generics which lead to the creation of Guice.
In 2009 developers from Spring, Guice, Redhat and some others got together to define JSR-330 - dependency injection for Java.
Some Guice developers went on to develop Dagger which was one of the first dependency injection libraries that used Java annotation processing to generate code for DI. This moved work that was previously done at runtime to build time, which made Dagger significantly faster and lighter than Guice. Dagger becomes heavily adopted for Android applications.
Using Java annotation processing to move dependency injection work from run time to build time is a common approach by Dagger, Micronaut, avaje-inject and Quarkus.
Around 2018, the pain points of using Spring DI with Kubernetes and resource limited containers becomes more obvious. Spring heavily relies on classpath scanning, reflection and defining dynamic proxies. This makes it relatively slow and hungry for both CPU and memory resources. In cloud deployment where we pay for CPU and memory, some developers started looking for another approach to DI which moved more (or virtually all) of that work to build time using Java annotation processing [as Dagger2 had been doing in the Android space for some years].
In 2018, Micronaut and avaje-inject (this library) are released which use
Java annotation processing to perform most of DI at build time rather than runtime.
In 2019 Quarkus is released which similarly uses Java annotation processing but
based on CDI.
Quick comparison to other DI libraries
Why not use Dagger2?
Dagger2 is not particularly orientated for server side developers. It has no lifecycle support (@PostConstruct + @PreDestroy) and does not have some features that we like from Spring DI (@Factory + @Bean, @Primary + @Secondary, conditional wiring, etc.).
Why not use Quarkus?
Quarkus comes with a DI implementation based on CDI. If CDI is your thing you'd look at Quarkus. Even so, avaje-inject is a much smaller library that's focused entirely on DI.
Why not Micronaut?
Micronaut DI and avaje-inject are both heavily influenced by Spring DI and
to some extent look pretty similar. avaje-inject has taken a source code generation
approach for readability and excluded @Value with a preference instead to
use a simple avaje-config style approach to external configuration.
In addition, avaje determines wiring order at compile-time, hence it doesn't need to take time to figure out all the dependency relationships at runtime.
Ultimately, avaje-inject is a relatively tiny library in comparison to Micronaut or Quarkus DI and focused on DI alone.
Spring DI
@Factory + @Bean
avaje-inject has @Factory + @Bean which work the same as Spring DI's @Configuration + @Bean and also Micronaut's @Factory + @Bean.
@Primary @Secondary
avaje-inject has @Primary and @Secondary annotations which work the same as Spring DI's @Primary @Secondary and also Micronaut DI's @Primary @Secondary.
These provide injection precedence in the case of injecting an implementation when multiple injection candidates are available.
Spring DI translation
| Spring | avaje-inject | JSR-330 |
|---|---|---|
| @Component, @Service, @Repository | @Singleton | Yes |
| FactoryBean<T> | Provider<T> | Yes |
| @Inject, @Autowired | @Inject | Yes |
| @Autowired(required=false) | @Inject Optional<T> | - |
| @PostConstruct | @PostConstruct | JSR 250 |
| @PreDestroy | @PreDestroy | JSR 250 |
| Non standard extensions to JSR-330 | ||
| @Configuration @Bean | @Factory @Bean | No |
| @Conditional | @RequiresBean and @RequiresProperty | No |
| @Primary | @Primary | No |
| @Profile | @Profile | No |
| @Secondary | @Secondary | No |
Spring DI translation NOT part of avaje-inject
| Spring | Other | |
|---|---|---|
| @Value | avaje-config | |
| @Controller | avaje-http @Controller | |
| @Transactional | Ebean @Transactional |
Why we don't have @Value/Refreshable Scopes
Both Spring and Micronaut have a @Value and by implication, they have chosen to combine "external configuration" in with "dependency injection".
With avaje-inject a design decision was made to keep these two ideas separate.
In theory we could have implemented this via source code generation with avaje-inject as:
public class EngineImpl$Proxy extends EngineImpl {

  public EngineImpl$Proxy() { // match super constructor,
    super();
    this.cylinders = Config.getInt("my.engine.cylinders", 6);
  }
}
Our reasons for not implementing are as follows.
Timing of setting the configuration
We can see that cylinders is only set after the super().
Any code that tries to use cylinders before that would get a 0 (or null with Integer etc).
This is relatively obvious to experienced devs but it is a source of bugs for less experienced devs.
That is, @Value fields have delayed initialization and this can trip people up / be a source of bugs.
If we don't use @Value and use Config.getInt() directly on the field, the behavior is completely unambiguous.
The values are initialized like any normal field.
Dynamic Configuration
With avaje-inject we create an effectively immutable BeanScope because we expect "external dynamic configuration" to be done independently from Dependency Injection (for example, by using avaje-config).
If we go from needing the configuration read and set once at startup to being read each time and potentially changing (aka dynamic configuration).
Then we'd need to change away from using @Value or add a complex "Refreshable Scope" concept to this library.
When using Config.getInt() directly, there is more freedom. We can use it anywhere - field, final field, static final field, in a method (dynamic configuration).
There isn't a big shift between static configuration and dynamic configuration.
Freedom
We have an excellent configuration library in avaje-config. It's simple, extendable, and mature as it was originally part of Ebean ORM and was extracted into its own project.
Even so, we want to give our users the freedom to choose whatever they like with external configuration libraries.
If we supported @Value in avaje-inject then we would have to pick a "configuration implementation" and force our avaje-config dependency where it's potentially unwanted.