Avaje Inject - v4 docs
Fast and light dependency injection library for Java and Kotlin developers.
| License | Source | API Docs | Issues | Releases |
|---|---|---|---|---|
| Apache2 | Github | Javadoc | Github | Latest 4.4 |
Uses Java annotation processing generating source code for dependency injection. That puts the work of performing dependency injection to build time rather than runtime increasing the speed of application start. There is no use of reflection or classpath scanning.
DI is generated source code allowing developers to see how it works and we can use existing IDE tools to search where code is called such as constructors and lifecycle methods. We can add debug breakpoints into the DI code as desired and step through it just like it was manually written code.
For a background on why avaje inject exists and a quick comparison with other DI libraries such as Dagger2, Micronaut, Quarkus and Spring goto - Why.
DI Library size
|
Do we care about the size of a DI library? Why is dagger and avaje-inject so much smaller? avaje-inject exists with the view that it can be really small and provide JSR-330 dependency injection using source code generation. It does not include AOP (which can be done separately), it does not include external configuration / properties (we can use avaje-config or something else). It just does DI. |

|
Releases for javax and jakarta
The move of JEE to the eclipse foundation meant a change in package from javax
to jakarta for various APIs including JSR-330 dependency injection API.
Today we have the choice of using the javax.inject dependency or using the new
jakarta.inject dependency.
Want to use javax.inject?
Use version 3.4 of
avaje-inject with the dependency on javax.inject (maintained on master branch).
Want to use jakarta.inject?
Use version 4.4 of
avaje-inject with the dependency on jakarta.inject (maintained on jakarta-master branch).
Based on JSR-330
avaje inject is based on JSR-330: Dependency Injection for Java - javax.inject / jakarta.inject with some extensions similar to Spring DI.
JSR-330 provides:
Spring DI like extensions to JSR-330
@Factory + @Bean
In addition to the JSR-330 standard we use @Factory + @Bean which work the same as Spring DI's @Configuration + @Bean and also Micronaut's @Factory + @Bean.
Teams will often use @Factory/@Bean to provide dependencies that
are best created programmatically - typically depending on external configuration,
environment settings etc.
Factory provides a more convenient alternative to the JSR-330 javax.inject.Provider<T> interface and is also more natural for people who familiar with Spring DI or Micronaut DI.
@Primary @Secondary
Additionally we use @Primary @Secondary annotations which work the same as Spring DI's @Primary @Secondary and also Micronaut DI's @Primary @Secondary. These provide injection priority in the case of injecting when multiple injection candidates are available.
Dependencies
Maven
See the basic example at: examples/basic-di/pom.xml
Add avaje-inject as a dependency.
<dependency>
  <groupId>io.avaje</groupId>
  <artifactId>avaje-inject</artifactId>
  <version>4.4</version>
</dependency>
Add avaje-inject-generator annotation processor as a dependency with provided scope.
<!-- Annotation processor -->
<dependency>
  <groupId>io.avaje</groupId>
  <artifactId>avaje-inject-generator</artifactId>
  <version>4.4</version>
  <scope>provided</scope>
</dependency>
Note that if there are other annotation processors and they are specified via maven-compiler-plugin annotationProcessorPaths then we add avaje-inject-generator there instead.
<plugin>
  <groupId>org.apache.maven.plugins</groupId>
  <artifactId>maven-compiler-plugin</artifactId>
  <configuration>
    <annotationProcessorPaths> <!-- All annotation processors specified here -->
      <path>
          <groupId>io.avaje</groupId>
          <artifactId>avaje-inject-generator</artifactId>
          <version>4.4</version>
      </path>
      <path>
          ... other annotation processor ...
      </path>
    </annotationProcessorPaths>
  </configuration>
</plugin>
Gradle
See the example at: examples/javalin-gradle-java-basic/build.gradle
Gradle 5.2+
Use Gradle version 5.2 or greater which has better support for annotation processing.
Also review the IntelliJ IDEA Gradle settings - see below.
Dependencies
Add avaje-inject as a compile dependency and avaje-inject-generator as an annotation processor.
dependencies {
  ...
  compile('io.avaje:avaje-inject:4.4')
  annotationProcessor('io.avaje:avaje-inject-generator:4.4')
}
Kotlin KAPT
See example at: https://github.com/dinject/examples/blob/master/basic-di-kotlin-maven/pom.xml
For use with Kotlin we register avaje-inject-generator as a kapt processor
to the Kotlin compiler rather than annotationProcessor.
dependencies {
  ...
  compile('io.avaje:avaje-inject:4.4')
  kapt('io.avaje:avaje-inject-generator:4.4')
}
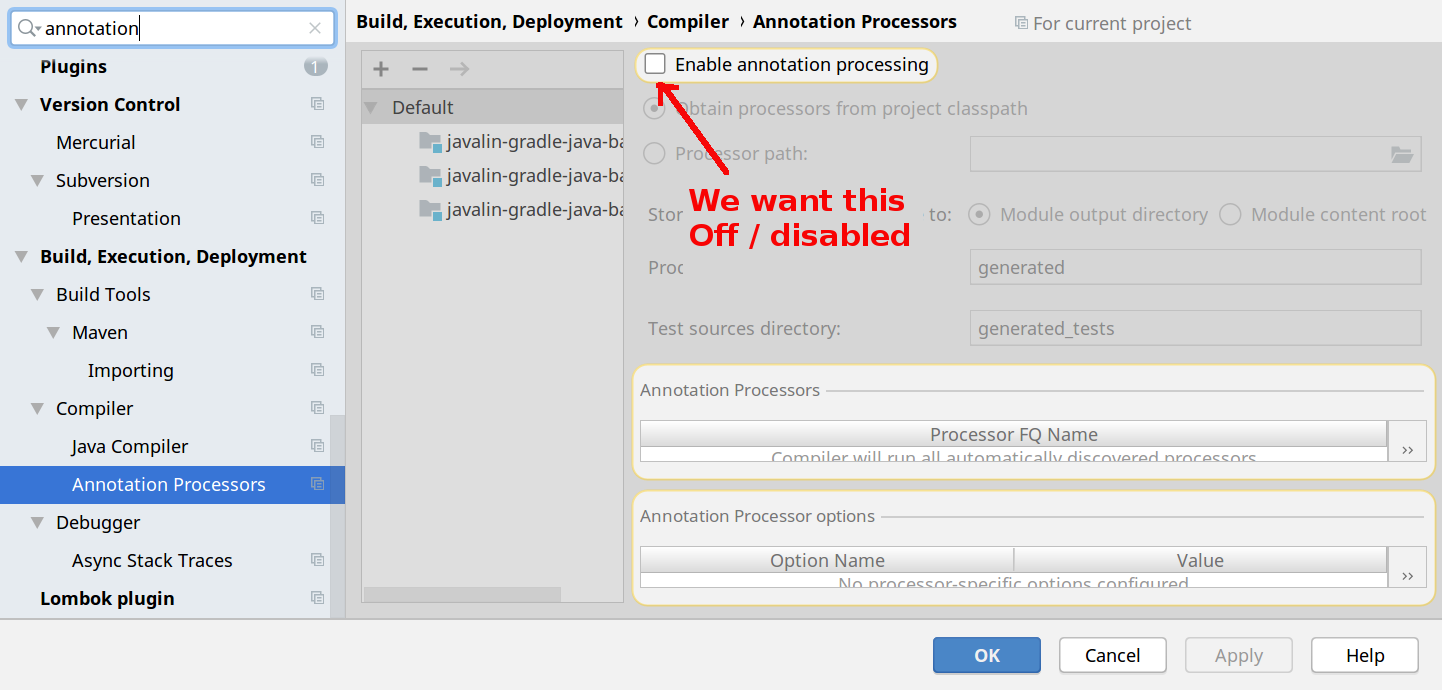
IntelliJ IDEA with Gradle
We want to delegate the build to Gradle (to properly include the annotation processing)
so check our IDEA settings.
Settings / Build / Compiler / Annotation processors
Ensure that Enable annotation processing is disabled so
that the build is delegated to Gradle (including the annotation processing):
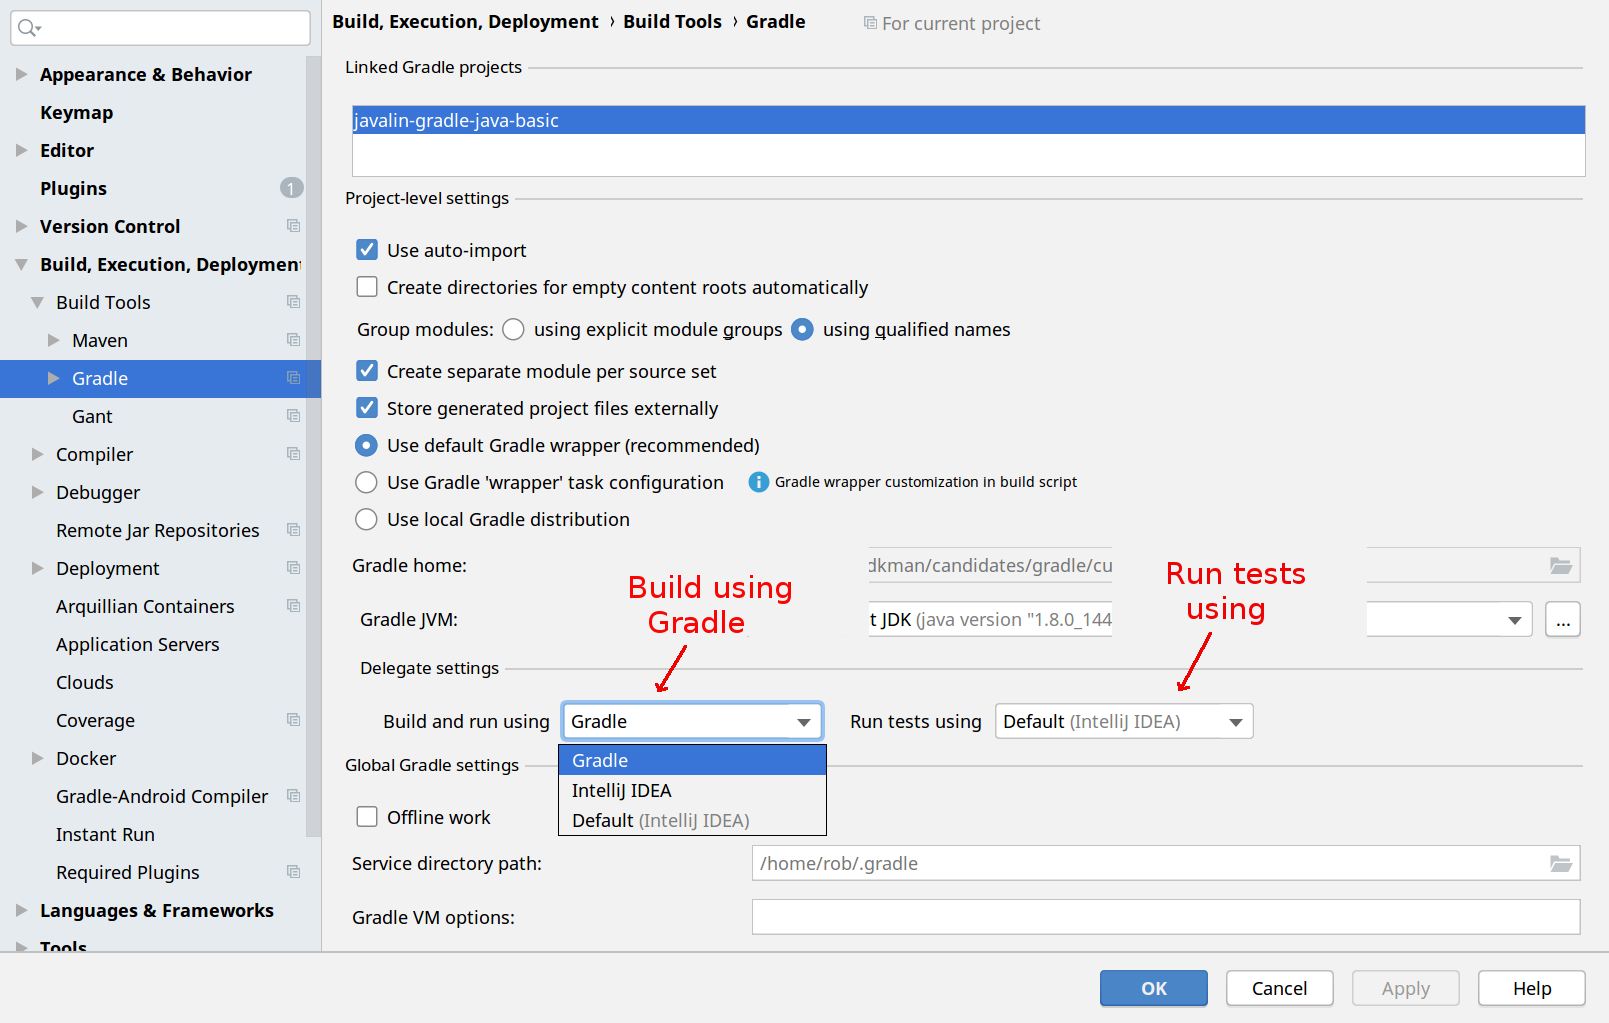
Settings / Build / Build tools / Gradle
Make sure Build and run is delegated to Gradle.
Optionally set Run tests using to Gradle but leaving it to IntelliJ IDEA should be ok.
JPMS - Java module system
avaje-inject supports the java module system. Add a requires clause and provides clause like the following:
module org.example {

  requires io.avaje.inject;

  // explicitly register the generated BeanContextFactory
  provides io.avaje.inject.spi.BeanContextFactory with org.example._DI$BeanContextFactory;
}
With JPMS we need to explicitly specify the generated BeanContextFactory
in a provides clause.
Injection
@Singleton
Put @Singleton on beans that we want dependency injection on.
These are beans that are created ("wired") by dependency injection and put into the context.
They are then available to be injected into other beans.
@Inject
Put @Inject on the constructor that should be used for constructor dependency injection.
Note that if there is only one constructor we don't need to put the @Inject on it.
If we want to use field injection put the @Inject on the field. Note that the field must not
be private and must not be final for field injection.
Constructor injection
@Singleton
public class CoffeeMaker {

  private final Pump pump;

  private final Grinder grinder;

  @Inject
  public CoffeeMaker(Pump pump, Grinder grinder) {
    this.pump = pump;
    this.grinder = grinder;
  }
  ...
The above CoffeeMaker is using constructor injection. Both a Pump and Ginder will be injected into the constructor when the DI creates (or "wires") the CoffeeMaker.
If there is only 1 constructor it is used for dependency injection and we don't need
to specify @Inject.
In general we do not expect to see logic in constructors as this typically makes it more difficult to write tests. If we see logic in a constructor then it is likely that we should try and move that logic to a Factory method instead.
Kotlin constructor
With Kotlin we frequently will not specify @Inject with only one constructor. The CoffeeMaker constructor injection then looks like:
@Singleton
class CoffeeMaker(private val pump: Pump , private val grinder: Grinder)  {

  fun makeCoffee() {
    ...
  }
}
Field injection
@Singleton
public class CoffeeMaker {

  @Inject
  Pump pump;

  @Inject
  Grinder grinder;
  ...
With field injection the @Inject is placed on the field and the field must not be private
and it must not be final.
Constructor injection preferred
Generally there is a preference to use constructor injection over field injection as constructor injection:
- Promotes immutability / use of final fields / proper initialisation
- Communicates required dependencies at compile time. Helps when dependencies change to keep test code in line.
- Helps identify when there are too many dependencies. Too many constructor arguments is a more obvious code smell compared to field injection. Promotes single responsibility principal.
Field injection for circular dependencies
We use field injection to handle circular dependencies. See below for more details.
Kotlin field injection
For Kotlin we can consider using lateinit on the property with field injection.
@Singleton
class Grinder {

  @Inject
  lateinit var pump: Pump

  fun grind(): String {
    ...
  }
}
Method injection
For method injection annotate the method with @Inject.
@Singleton
public class CoffeeMaker {

  Grinder grinder;

  @Inject
  void setGrinder(Grinder grinder) {
    this.grinder = grinder;
  }
  ...
Mixed constructor, field and method injection
We are allowed to mix constructor, field and method injection. In the below example the Grinder is injected into the constructor and the Pump is injected by field injection.
@Singleton
public class CoffeeMaker {

  @Inject
  Pump pump;

  private final Grinder grinder;

  public CoffeeMaker(Grinder grinder) {
    this.grinder = grinder;
  }
Circular dependencies
When we have a circular dependency then we need to use field injection on one of the dependencies.
For example, lets say we have A and B where A depends on B and B depends on A. In this case we can't use constructor injection for both A and B like:
// circular dependency with constructor injection, this will not work !!

@Singleton
class A {
  B b;
  A(B b) {       // constructor for A depends on B
    this.b = b;
  }
}

@Singleton
class B {
  A a;
  B(A a) {       // constructor for B depends on A
    this.a = a;
  }
}
With the above circular dependencies for A and B constructor injection avaje-inject can not determine the order in which to construct the beans. avaje-inject will detect this and product a compilation error outlining the beans involved and ask us to change to use field injection for one of the dependencies.
We can not use constructor injection for both A and B and instead we must use field injection on either A or B like:
@Singleton
class A {
  @Inject   // use field injection
  B b;
}

@Singleton
class B {
  A a;
  B(A a) {
    this.a = a;
  }
}
The reason this works is that field injection occurs later after all the
dependencies are constructed. avaje-inject uses 2 phases to
"wire" the beans and then a 3rd phase to execute the @PostConstruct
lifecycle methods:
- Phase 1: Construct all the beans in order based on constructor dependencies
- Phase 2: Apply field injection on all beans
- Phase 3: Execute all
@PostConstructlifecycle methods
Circular dependencies more commonly occur with more than 2 beans. For example, lets say we have A, B and C where:
- A depends on B
- B depends on C
- C depends on A
With A, B, C above they combine to create a circular dependency. To handle this we need to use field injection on one of the dependencies.
Optional
We can use java.util.Optional<T> to inject optional dependencies.
These are dependencies that might not be provided / might not have an available implementation
/ might only be provided based on configuration (a bit like a feature toggle).
@Singleton
class Pump {

  private final Heater heater;

  private final Optional<Widget> widget;

  @Inject
  Pump(Heater heater, Optional<Widget> widget) {
    this.heater = heater;
    this.widget = widget;
  }

  public void pump() {
    if (widget.isPresent()) {
      widget.get().doStuff();
    }
    ...
  }
}
Spring DI Note
Spring users will be familiar with the use of @Autowired(required=false)
for wiring optional dependencies. With avaje-inject we instead use Optional
to inject optional dependencies.
@Nullable
As an alternative to Optional we can use @Nullable to indicate that a dependency
is optional / can be null. Any @Nullable annotation can be used, it does not
matter which package the annotation is in.
@Singleton
class Pump {

  private final Heater heater;

  private final Widget widget;

  @Inject
  Pump(Heater heater, @Nullable widget) {
    this.heater = heater;
    this.widget = widget;
  }

  public void pump() {
    if (widget != null) {
      widget.doStuff();
    }
    ...
  }
}
List
We can inject a java.util.List<T> of beans that implement an interface.
@Singleton
public class CombinedBars {

  private final List<Bar> bars;

  @Inject
  public CombinedBars(List<Bar> bars) {
    this.bars = bars;
  }
Set
We can inject a java.util.Set<T> of beans that implement an interface.
@Singleton
public class CombinedBars {

  private final Set<Bar> bars;

  @Inject
  public CombinedBars(Set<Bar> bars) {
    this.bars = bars;
  }
Provider
A Singleton bean can implement javax.inject.Provider<T> to create a bean to
be used in injection.
@Singleton
public class FooProvider implements Provider<Foo> {

  private final Bazz bazz;

  FooProvider(Bazz bazz) {
    this.bazz = bazz;
  }

  @Override
  public Foo get() {
    // maybe do interesting logic, read environment variables ...
    return new BasicFoo(bazz);
  }
}
Note that the alternative to using the javax.inject.Provider<T> interface is
to instead use @Factory and @Bean
as it is more flexible and convenient than the the provider interface.
Spring DI Note
The JSR 330 javax.inject.Provider<T> interface is functionally the same
as Spring DI FactoryBean<T>.
@Factory
Factory beans allow us to programmatically creating a bean. Often the logic is based on external configuration, environment variables, system properties etc.
We annotate a class with @Factory to tell us that it contains methods
that create beans. The factory class can itself have dependencies and the methods
can also have dependencies.
@Factory @Bean are equivalent to Spring DI @Configuration @Bean and Micronaut @Factory @Bean.
@Bean
We annotate methods on the factory class that create a bean with @Bean.
These methods can have dependencies and will execute in the appropriate order
depending on the dependencies they require.
Example
@Factory
class Configuration {

  private final StartConfig startConfig;

  /**
   * Factory can have dependencies.
   */
  @Inject
  Configuration(StartConfig startConfig) {
    this.startConfig = startConfig;
  }

  @Bean
  Pump buildPump() {
    // maybe read System properties or environment variables
    return new FastPump(...);
  }

  /**
   * Method with dependencies as method parameters.
   */
  @Bean
  CoffeeMaker buildBar(Pump pump, Grinder grinder) {
    // maybe read System properties or environment variables
    return new CoffeeMaker(...);
  }
}
@Bean initMethod & destroyMethod
With @Bean we can specify an initMethod
which will be executed on startup like @PostConstruct.
Similarly a destroyMethod which execute on shutdown like @PreDestroy.
Example
@Factory
class Configuration {
  ...
  @Bean(initMethod = "init", destroyMethod = "close")
  CoffeeMaker buildCoffeeMaker(Pump pump) {
    return new CoffeeMaker(pump);
  }
}
The CoffeeMaker has the appropriate methods that are executed as part of the lifecycle.
class CoffeeMaker {

  void init() {
    // lifecycle executed on start/PostConstruct
  }
  void close() {
    // lifecycle executed on shutdown/PreDestroy
  }
  ...
}
Optional @Bean
We can use Optional<T> to indicate that the method produces
an optional dependency.
Often the dependency is only provided based on external configuration a bit like a feature toggle / config toggle. For example, we might do this in a CI/CD environment until such time that the dependency is always "ON" in all environments and then we change to make the dependency not optional.
Example - Optional dependency
@Factory
class Configuration {

  /**
   * Optionally provide MessageQueue.
   */
  @Bean
  Optional<MessageQueue> buildQueue() {
    if (...) { // maybe read external config etc
      // Not providing the dependency (kind of like feature toggle)
      return Optional.empty();
    }
    return Optional.of(...);
  }

}
Use of @Factory @Bean
It is good to use @Factory for all the dependencies we want to
create programmatically. Many teams will have a standard location/package they use to
put a "configuration factory bean" where all programmatically created dependencies are
defined as a general approach.
If we see logic in constructors then we typically would try to move that logic to a factory bean method and keep the constructors simple. Logic in constructors typically makes it harder from a testing perspective.
@Primary
A bean with @Primary is deemed to be highest priority and will be injected and used
when it is available. This is functionally the same as Spring and Micronaut @Primary.
There should only ever be one bean implementation marked as @Primary for a given dependency.
Example
// Highest priority EmailServer
// Used when available (e.g. module in the class path)
@Primary
@Singleton
public class PreferredEmailSender implements EmailServer {
  ...
@Secondary
A bean with @Secondary is deemed to be lowest priority and will only be injected
if there are no other candidates to inject. We use @Secondary to indicate a
"default" or "fallback" implementation that will be superseded by any other available implementation.
This is functionally the same as Spring and Micronaut @Secondary.
Example
// Lowest priority EmailServer
// Only used if no other EmailServer is available
@Secondary
@Singleton
public class DefaultEmailSender implements EmailServer {
  ...
Use of @Primary and @Secondary
@Primary and @Secondary are used when there are
multiple candidates to inject. They provide a "priority" to determine which dependency to
inject and use when injecting a single implementation and multiple candidates are available
to inject.
We typically use @Primary and @Secondary when we are building multi-module applications. We have multiple modules (jars) that provide implementations. We use @Secondary to indicate a "default" or "fallback" implementation to use and we use @Primary to indicate the best implementation to use when it is available. avaje-inject DI will then wire depending on which modules (jars) are included in the classpath.
Qualifiers
@Named
When we have multiple beans that implement a common interface and we can qualify
which instance is used by specifying @Named on the beans and where
they are injected.
Lets say we have a Store interface with multiple implementations. We can have multiple implementations with @Named qualifier like the example below.
@Named("blue")
@Singleton
public class BlueStore implements Store {
  ...
}


@Named("red")
@Singleton
public class RedStore implements Store {
  ...
}
Alternatively if we are creating the instances using @Factory @Bean methods we can similarly put @Named on the @Bean methods.
@Factory
public class StoreFactory {

  @Bean @Named("red")
  public Store createRedStore() {
    return new RedStore(...);
  }

  @Bean @Named("blue")
  public Store createBlueStore() {
    return new BlueStore(...);
  }
}
We can then specify which @Named instance to inject by specifying the qualifier.
@Singleton
public class OrderProcessor {
  private final Store store;

  public OrderProcessor(@Named("red") Store store) {
    this.store = store;
  }
  ...
@Singleton
public class OrderProcessor {

  @Inject @Named("red")  // field injection
  Store store;

  ...
@Qualifier
Instead of using @Named we can create our own annotations using @Qualifier.
This gives a strongly typed approach to qualifying the beans rather than using string literals in
@Named so could be better when there is a lot of named/qualified beans.
example
import javax.inject.Qualifier;
import java.lang.annotation.Retention;
import java.lang.annotation.RetentionPolicy;

@Qualifier
@Retention(RetentionPolicy.RUNTIME)
public @interface Blue {}
Then we can use our @Blue annotation.
@Blue
@Singleton
public class BlueStore implements Store {
  ...
@Singleton
public class StoreManager {

  private final Store store;

  public StoreManager(@Blue Store store) {
    this.store = store;
  }
  ...
Lifecycle
@PostConstruct
Put @PostConstruct on a method that we want to run on startup just after all the
beans have been wired.
Typically we open a resource like network connections to a remote resource (cache, queue, database etc).
@Singleton
public class CoffeeMaker {

  @PostConstruct
  void onStartup() {
    // connect to remote resource ...
    ...
  }
  ...
@PreDestroy
Put @PreDestroy on a method that we want to run on shutdown.
Typically we want this method to close resources.
@Singleton
public class CoffeeMaker {

  @PreDestroy
  void onShutdown() {
    // close resources
    ...
  }
  ...
Context
SystemContext
SystemContext provides application scope to an underlying
BeanContext and convenience methods to access the beans from that
underlying BeanContext.
example
// Get a bean from the context
CoffeeMaker coffeeMaker = SystemContext.getBean(CoffeeMaker.class);
coffeeMaker.brew();
// Get all the beans that implement an interface
List<WebRoutes> webRoutes = SystemContext.getBeans(WebRoutes.class);

// register them with Javalin
Javalin app = Javalin.create();
app.routes(() -> webRoutes.forEach(WebRoutes::registerRoutes));
app.start(8080);
SystemContext.context()
We use SystemContext.context() to get the underlying BeanContext.
example
// Get the underlying context
BeanContext context = SystemContext.context();

// Get a bean from the context
CoffeeMaker coffeeMaker = context.getBean(CoffeeMaker.class);
coffeeMaker.brew();
BeanContext
The methods on BeanContext that we use to obtain beans out of the context are:
getBean(type)
Return a single bean given the type.
StoreManager storeManager = beanContext.getBean(StoreManager.class);
StoreManager.processOrders();
getBean(type, qualifier)
Return a single bean given the type and name.
Store blueStore = beanContext.getBean(Store.class, "blue");
blueStore.checkOrders();
getBeans(type)
Return the list of beans that implement the interface.
// e.g. register all routes for a web framework

List<WebRoute> routes = beanContext.getBeans(WebRoute.class);
getBeansWithAnnotation(annotation type)
Return the list of beans that have an annotation.
// e.g. register all controllers with web a framework
// .. where Controller is an annotation on the beans

List<Object> controllers = beanContext.getBeansWithAnnotation(Controller.class);
The classic use case for this is registering controllers or routes to web frameworks like Sparkjava, Javlin, Rapidoid etc.
getBeansByPriority(type)
Return the list of beans that implement the interface sorting by priority.
// e.g. filters that should be applied in @Priority order

List<Filter> filters = beanContext.getBeansByPriority(Filter.class);
BeanContext.newBuilder()
For testing purposes we sometimes want to wire the beans but provide test doubles, mocks, spies for some of the dependencies. We do this using BeanContext builder.
withMock()
We can use withMock() to have Mockito mocks
injected in place of the normal behaviour.
@Test
public void myComponentTest() {

  try (BeanContext context = BeanContext.newBuilder()
    .withMock(Pump.class)
    .withMock(Heater.class)
    .withMock(Grinder.class, grinder -> {
      // setup the mock
      when(grinder.grindBeans()).thenReturn("stub response");
    })
    .build()) {

    // Act
    CoffeeMaker coffeeMaker = context.getBean(CoffeeMaker.class);
    coffeeMaker.makeIt();

    Grinder grinder = context.getBean(Grinder.class);
    verify(grinder).grindBeans();
}
withSpy()
We can use withSpy() to get the beans to be enhanced with Mockito Spy.
We typically want to do this when we want the bean to have most or all of it's behaviour and only stub out some of it's behaviour and track it's interactions.
@Test
public void myComponentTest() {

  try (BeanContext context = BeanContext.newBuilder()
    .withSpy(Pump.class, pump -> {
      // setup the spy, only stub out pumpWater()
      doNothing().when(pump).pumpWater();
    })
    .build()) {

    // or setup here ...
    Pump pump = context.getBean(Pump.class);
    doNothing().when(pump).pumpSteam();

    // act
    CoffeeMaker coffeeMaker = context.getBean(CoffeeMaker.class);
    coffeeMaker.makeIt();

    verify(pump).pumpWater();
    verify(pump).pumpSteam();
  }

}
withBeans()
We can use withBeans() to supply our own test doubles.
@Test
public void myComponentTest() {

  // create our test doubles to use
  Pump pump = mock(Pump.class);
  Grinder grinder = mock(Grinder.class);

  try (BeanContext context = BeanContext.newBuilder()
    .withBeans(pump, grinder)
    .build()) {

    // act
    CoffeeMaker coffeeMaker = context.getBean(CoffeeMaker.class);
    coffeeMaker.makeIt();

    // assert
    assertThat(...)
  }

}
Modules
Single module apps
When we are wiring dependencies that are all part of a single jar/module then we don't really care about modules. All the dependencies that are being injected are known and provided by the same jar/module.
In a single module app there is only 1 BeanContext.
Multi-module apps
When we are wiring dependencies that span multiple jars/modules then we to provide more
control over the order in which each modules dependencies are wired. We provide this control
by using @ContextModule.
In a multi-module app there is 1 BeanContext per module and avaje-inject needs to determine the order in which the modules are wired. It does this using the module provides and dependsOn.
Unnamed modules
When we don't specify @ContextModule on a module it is an unnamed module. In effect a module name is derived from the top most package and that module has no provides or dependsOn specified.
@ContextModule
Use @ContextModule to explicitly name a module and define the features it provides
and the features it dependsOn. The provides and dependsOn effectively control
the order in which modules are wired.
@ContextModule(name = "feature-toggle")
We use the @ContextModule annotation to give a module an explicit name.
Module dependsOn
Modules that depend on functionality / beans from other modules specify in dependsOn
the modules that should provide beans they want to inject.
@ContextModule(name = "job-system", dependsOn = {"feature-toggle"})
With the above example the "job-system" module expects bean(s) from the "feature-toggle" module to be available for injecting into it's bean graph.
For avaje-inject internally this defines the order in which the bean contexts in each of the modules are created. avaje-inject finds all the modules in the classpath (via Service loader) and then orders the modules based on the dependsOn values. In the example above the "feature-toggle" bean context must be built first, and then the beans it contains are available when building the "job-system" bean context.
Why avaje inject exists
Short History of DI on the JVM
For a short history of DI on the JVM see below and refer to PicoContainer - inversion of control history
- 1998 - Avalon
- 2003 - Spring and PicoContainer
- 2005 - Guice
- 2009 - JSR 330 javax.inject
- 2013 - Dagger1
- 2015 - Dagger2
- 2018 - Micronaut
- 2018 - Avaje-Inject (dinject)
- 2019 - Quarkus
Stefano Mazzocchi popularises the term, Inversion of Control and the Apache Avalon project starts.
Spring and PicoContainer lead the initial adoption of DI. Java 5 came out with new language features which included annotations and generics which lead to the creation of Guice.
In 2009 developers from Spring, Guice, Redhat and some others got together to define JSR-330 - dependency injection for Java.
Some Guice developers went on to develop Dagger which I believe was the first dependency injection library that used Java annotation processing to generate code for DI. This moves work that was previously done at runtime to build time and made Dagger significantly faster and lighter than Guice. Dagger becomes heavily adopted for Android applications.
Using Java annotation processing to move dependency injection work from run time to build time is common approach by Dagger, Micronaut, avaje-inject and Quarkus.
Around 2018 the pain points of using Spring DI with Kubernetes and resource limited containers becomes more obvious. The way Spring DI works means that at startup time it performs a lot of work that includes classpath scanning, heavy use of reflection and defining dynamic proxies. This makes it relatively slow and hungry for both CPU and memory resources. With cloud deployment where we pay for CPU and memory some developers start looking for another approach to DI which puts more (or virtually all) of that work to build time using Java annotation processing [as Dagger2 had been doing in the Android space for some years].
In 2018 Micronaut and avaje-inject (this library) are released which use Java annotation processing to perform most of DI at build time rather than runtime. In 2019 Quarkus is released which similarly uses Java annotation processing but is based on CDI.
Quick comparison to other DI libraries
Why not use Dagger2?
Dagger2 is not particularly orientated for server side developers with no lifecycle support (@PostConstruct/@PreDestroy) and does not have some features that we like from Spring DI (@Factory/@Bean + @Primary/@Secondary).
Why not use Quarkus?
Quarkus comes with a DI implementation based on CDI. If CDI is your thing you'd look at Quarkus.
Why not Micronaut?
Micronaut DI and avaje-inject are both heavily influenced by Spring ID and look very similar in feature set.
Micronaut DI was relatively strongly linked to the rest of the Micronaut framework where as avaje-inject is relatively small in comparison and focused on DI alone. Micronaut generates bytecode where as avaje-inject generates source code making the functionality of DI fully transparent to developers.
http servers
avaje-inject is a lightweight DI library that is especially suited to building http based services using Javalin and Helidon SE.
We can build rest controllers and target either Javalin or Helidon SE using as little or as much of either Javalin or Helidon as we like.
Javalin
Create JAX-RS style controllers targeting Javalin. Write controller methods that take the Javalin context as a method argument or have it injected as a request scoped bean.
See here for more details.
Helidon SE
Create JAX-RS style controllers targeting Helidon SE. Write controller methods that take the Helidon server request and/or response as method arguments or have them injected into the controller as request scoped beans.
See here for more details.
Spring DI
@Factory + @Bean
avaje-inject has @Factory + @Bean which work the same as Spring DI's @Configuration + @Bean and also Micronaut's @Factory + @Bean.
@Primary @Secondary
avaje-inject has @Primary and @Secondary annotations which work the same as Spring DI's @Primary @Secondary and also Micronaut DI's @Primary @Secondary.
These provide injection precedence in the case of injecting an implementation when multiple injection candidates are available.
Spring DI translation
| Spring | avaje-inject | JSR-330 |
|---|---|---|
| @Component, @Service, @Controller, @Repository | @Singleton | Yes |
| FactoryBean<T> | Provider<T> | Yes |
| @Inject, @Autowired | @Inject | Yes |
| @Autowired(required=false) | @Inject Optional<T> | Yes |
| @PostConstruct | @PostConstruct | Yes |
| @PreDestroy | @PreDestroy | Yes |
| Non standard extensions to JSR-330 | ||
| @Configuration @Bean | @Factory @Bean | No |
| @Primary | @Primary | No |
| @Secondary | @Secondary | No |
AOP
avaje-inject does not include AOP as other libraries provide build time AOP
for @Transactional,
Metrics @Timed
and configuration injection via avaje-config.
Performing AOP at build time is important as it removes the runtime cost at startup of using dynamic proxies.
The following are library recommendations for @Transactional, @Value and @Timed.
| Spring | Recommendation |
|---|---|
| @Transactional | Ebean @Transactional |
| @Value | Avaje Config |
| @Timed | Avaje Metrics |